Tuesday, 28 March 2017

Karahi Gosht/ Mutton Karahi

A perfect thriller makes my day and night too! A good book in hand and the literature within the levels of my understanding, then I have the potential of forgetting just about every thing around me - you will see me in the company of the book in the kitchen too. I may burn a chapatti or two in the go. I spent a major chunk of my single days immersed in such books and I had a perfect roommate for company. Our love for thrillers and mystery extended to television shows as well - Savdhaan India on Life Ok and Crime Patrol on Sony TV were hot favorites.  Both these shows end with the charming hosts signing off  saying - Be Cautious!! Our cautiousness extended to a level were both of us doubted everything we saw and heard. So negative was the impact that we decided to stop watching these series and stick to books which were more of fictitious work than reality.

My married days are no better - both of us love the same kind of book and we had membership in the same chain of library - Just Books in Bangalore. Post marriage we cancelled my membership and upgrading his and the reason for cancelling mine on the form was - 'Got Married'! Archies Library in Karama is our favorite haunt for books. A good thriller could see us through a bad day and once you have reached the last few pages of the book - you have those moments when you somehow wanna get hold of the book and find out the culprit. I am now an expert at guessing the culprit too - yeah atleast 70% of the times I do - so beware if you wanna watch a thriller with me - I may spoil the fun!

If you are wondering why I am rambling on about thrillers - I have a book in hand now that I started reading yesterday and can't wait to get back to it !

So let me go and have my hot cup of chai with my book while you guys take a look at this recipe. It is simple - because you cook most of the ingredients together and you have your time to grab a book if you need between cooking!

kitchenspells.blogspot.com


Ingredients
  1. Mutton/Lamb - 1 kg
  2. Ginger garlic paste - 3 tsp
  3. Turmeric powder - 1/4 tsp
  4. Butter - 50 grams
  5. Onions - 4 medium sliced
  6. Tomato - 2 medium sliced
  7. Kalonji/Nigella seeds - 1/2 tsp
  8. Jeera powder/cumin powder - 1/2 tsp
  9. Coriander powder - 3 tsp
  10. Kashmiri chilli powder - 2 tsp
  11. Turmeric powder - 1/4 tsp
  12. Coriander leaf - 1 cup tightly packed
  13. Kasoori methi - 4 tbsp
  14. Water - 1 cup
  15. Yogurt - 1/4 cup
  16. Salt
kitchenspells.blogspot.com

Method
  • Marinate the mutton pieces in turmeric powder and ginger garlic paste for 30 minutes.
  • Heat butter in a deep bottomed pan, Add the marinated mutton slices to this and let it fry until the mutton pieces just begin to change color.
  • Add the onions, tomatoes,kalonji,cumin powder, coriander powder, kashmiri chilli powder, turmeric powder along with salt. Coat the meat in the masala and let the meat cook covered on medium low. This may take 45 minutes to an hour depending on the mutton you use.
  • Crush the kasoori methi between your palms and add it to the gravy. Sprinkle the coriander leaves.
  • Finally add the yogurt and adjust salt.
  • Serve hot!

Wednesday, 22 March 2017

Crispy Sweet Corn

kitchenspells.blogspot.com

I keep saying that every dish has a story behind it and Shibin says every photograph should tell a story. So we definitely have a 'Once upon a time' in this dish and a 'happily ever after' too.

Most of us have heard of Barbeque Nation and have atleast been there once to satiate our barbeque cravings.What you probably did not know was this restaurant chain is owned by Indore based Sayyaji Hotel. I was fortunate enough to spend two days here and that is where my love affair with crispy fried sweet corn started. I have tried making this snack couple of times - but never achieved success till about two weeks back. This definitely does not meet BBQ Nation standards but still we loved it this way.
Last week, we had a family over for dinner and we spent most of the time playing carroms. The need for a quick snack at the carroms table was what reminded me of this recipe. It turned out crispy as I wanted it to and that led me to making it again the very next day for the blog. That is when Shibin suggested that we make it a snack for our evening trip to the beach and photograph it there. For him, this seemed an ideal picnic snack and where better than a trip to the beach. We had some fun time creating those cones too - super fun to see Shibin trying to create cones and ending up with huge ones that would hold almost  a 1 kg of the kernels:P Some childish crafting at work:) Blogging is fun!

kitchenspells.blogspot.com


Here is the recipe -

Ingredients

  1. Sweet Corn kernels - 1 cup
  2. All Purpose Flour - 3 tbsp
  3. Corn Flour - 3 tbsp
  4. Chilli powder - 1 tsp
  5. Onion - 1 finely sliced
  6. Coriander leaves - 2 tbsp finely chopped
  7. Water - 2 tbsp
  8. Salt to taste
  9. Oil
Method
  • Mix together all purpose flour, corn flour, chilli powder and salt.
  • In a bowl, use your hands to mix together the dry ingredients with the sweet corn kernels.
  • Sprinkle 2 tbsp water on this and give a firm mix so that the batter holds on to the kernels.
  • Heat oil in a deep pan and test by dropping one kernel into it. It has to crackle and rise to the top.
  • Keep the flame on medium throughout and once the oil is ready, drop a handful of kernel into it. Let it fry and rise to the top.
  • Drain excess oil on tissue paper.
  • Transfer to a bowl, add chopped onions and coriander leaves. Sprinkle a little chilli powder and give it a good toss.
  • An easy snack for those lazy evenings.

You may also note - 
  • Fry as soon as you make the mix, do not let it rest for too long as it tends to get a little soggy and will end up holding kernels as a bunch and not as individual ones.

Thursday, 16 March 2017

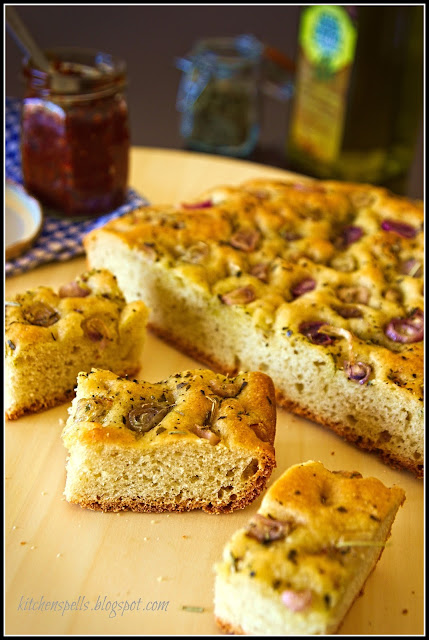
Herbed Focaccia with caramelised shallots

kitchenspells.blogspot.com


I am relatively a beginner in bread baking and this is probably the only bread I have baked more than the fingers on my hand! I tasted focaccia only when I came to Dubai and that was the first time I even heard of it. Back in India, I knew 4 types of bread - white bread, brown bread, multigrain bread and fruit bread - that was my extent of bread knowledge.  I would not label bread baking as difficult - it is only time consuming - so if you have the time in hand - Foccacia is definitely worth a try.

Focaccia is an Italian bread with a generous amount of olive oil - topped with herbs, olives, onions, sun-dried tomatoes or any other vegetables that goes along. Focaccia, I realised recntly makes a good sandwich bread too! I have tried topping with olives , tomato and onions but the best for me was the shallots. It is easier to chop them into cute little rounds - it caramelizes well and the looks quite pretty on the bread too. I read an article today by Nandita Iyer from the Saffron Trail in the Hindu where she outlines the need to eat with your senses and we did just that with focaccia!

kitchenspells.blogspot.com


Ingredients

  1. All Purpose Flour - 1½ cup + extra for dusting
  2. Water - ½ cup warm
  3. Instant yeast - 11 gm sachet
  4. Olive oil - ½ cup (¼ +¼ divided)
  5. Shallots - ¼ cup
  6. Sugar - 3 tbsp
  7. Garlic and Herb seasoning - 1½ tsp
  8. Semolina - 2 tsp
Method
  • Dissolve the yeast and sugar in warm water. Let it rest for 5 minutes.
  • Sieve together the flour and salt into a bowl. Make a well at the center of the bowl and slowly add the warm water mixing it together using a fork.
  • Now add olive oil - ¼ cup in small batches till the dough holds itself together. The dough is going to be sticky at this point.
  • Dust your work surface with a little flour and tip the dough over. Knead for roughly 5 to 10 minutes. The dough should not be very hard to knead, it should be smooth and easy to stretch.
  • Grease a bowl with a little olive oil - cover with a cling film and let it rest for 45 minutes to 1 hour in a warm place to double itself.
  • Meanwhile, chop the shallots into rounds and add a tsp of olive oil to this and give it a good mix.
  • Take a baking tray and sprinkle semolina at the base of the tray. 
  • The dough in one hour would double itself and would have a very smooth texture. Punch it down and tip it over into the tray and firmly press down with your hand to attain the shape of the tray uniformly. Poke into the dough using your finger tips to create random patterns as you can see on the bread .( Trust me it is superb fun to do that!!)
  • Sprinkle the seasoning and spread the shallots over the surface. Give it a light press so that it holds itself to the dough but doesn't insert itself.
  • Sprinkle a little bit of salt all over and be generous with you olive oil on the surface.
  • Cover it with a cling film and let it stand for 45 minutes.
  • Pre-heat your oven to 220 degree centigrade  and place in the tray. Bake for 30 minutes till the top of the bread begins to brown.
  • Remove it from the oven and let it cool for 5 minutes before you dig in you knife:)
  • Focaccia is a breakfast or snack in itself that goes well along with your coffee or tea. The herbs and the olive oil gets infused into the bread and the caramelized shallots give the focaccia a lovely aroma.
  • You could also try this with a chilli chutney which I thought was a lovely combo!
kitchenspells.blogspot.com

You may also note -
  • It is necessary to knead the dough well and leave it for proofing. Ensure that the dough has risen - approximately an hour should do but colder areas may require more time.
  • Usual recipes call for 20 minutes bake time - I got mine done in 30 minutes so keep checking yours to ensure the lovely brown color on top.
  • Avoid opening the oven too many times to check - check at the 20 minute mark first.

Sunday, 12 March 2017

Sindhi Fish Pulav

 The first year of your married life is no doubt the most enthralling one. I don't mean to dishearten the ones who after years of marriage still feel the magic of marriage. I am somewhere in the same place too even after being married for over three years. But it is just that, there is still some force in me that makes me wanna go back to that first year! Some interesting anecdotes too...
As is usual,my proof reader is gonna read this blog and I am just wondering what his response is gonna be seeing the dig at him:P
As is normal for an Indian married woman, a week after we settled down in Bangalore - I religiously began cooking all the three meals a day and as a dutiful wife asked him what he wants for lunch in his dabba.
His response was spontaneous - Oh No! Carrying a dabba is so typical of a married man. Get married and then carry a dabba to office. I am good without one, you do not have to make lunch for me on weekdays.
I was ecstatic, I only needed to cook for myself as my cafeteria food offered no delights ( the irony of it all was I was the chairman of the office food committee :P psst psst - Let us not delve into that now).  About a month after that, one evening my dear husband walks up to me and decides to make a transition from being single to carrying the dabba symbolic of marriage! I just could not stop from passing snide remarks! What brought about this change - though I can't exactly remember was something to do with his cafeteria closing or shifting but I choose to believe that it is because he was now certain that his wife could cook:)
All said and done - he is my best critique and never insists on carrying a dabba everyday. So I take all the freedom to cook what I want, how I want and the way I want it yet I ensure that I do not take it for granted.

Over to my recipe - well although I made it - this was given by a Sindhi friend of mine - Shweta - an ex-colleague with whom I have had 'n' number of coffees and delightful crowded metro rides!!

Oh and why did I mention the anecdote above? Simply because it is a perfect recipe for your dabba!

kitchenspells.blogspot.com

Ingredients
  1. Fish Fillet - 800 gms (boneless)
  2. Onion - 4 medium sized finely sliced
  3. Tomato - 2 medium sized  sliced
  4. Green chilli - 2 to 3 slit
  5. Coriander powder - 4 tsp
  6. Chilli powder - 2 tsp
  7. Turmeric powder- 1/2 tsp
  8. Bay Leaf - 2
  9. Basmati Rice - 1 and 1/2 cup
  10. Salt
Method
  • Soak the basmati rice in warm water for half an hour. Drain the water and set aside.
  • Heat oil in a cooking pot and sauté the onions until deep brown in color.
  • Then add the tomatoes, chilli, the masala powder along with bay leaves . Stir and let it cook covered until the tomato melts in and oil begins to separate.
  • Add the fish and salt into the masala along with 2 cups of water. Let the fish cook on low flame.
  • Once cooked, scoop out the fish along with a little of the masala carefully so as to not break it.
  • Add about 1 cup of water ( or just enough water for the basmati rice to cook) to the gravy along with basmati rice and let it cook covered. Adjust salt at this point.
  • Fry the scooped out fish without oil in a pan until the gravy forms a coat over the fish - about 2 minutes on medium flame on both the sides.
  • Serve the rice onto a plate and layer the fish slices on the top. Add a final garnish of coriander leaves.
kitchenspells.blogspot.com

You may also note - 
  • It is better to use boneless fish in the pulav making it easier to eat, avoiding the hassle of having to dig into the bones.
  • Avoid stirring the fishes once it is cooked to prevent breaking of the slices. Rotate the whole of the cooking pot instead of stirring.

Thursday, 9 March 2017

Chilli Chutney

Karnataka has been my home until I moved to Dubai two years back. Brought up in a small town called Brahmavar in Udupi district and then completed my post graduation and experienced my first feel of corporate life in Bangalore. These are two unique places with its own charm. Karnataka has it all - from the coastal stretch of Mangalore - Gokarna to the mountainous charms of Coorg and Sakleshpur, not to forget the temple towns of Belur, Halebidu , Hampi and Bangalore - the silicon city of India. I have not yet traveled all these places but one day, I do wish to strike off all these from my bucket list.

Chikmaglur is one such beautiful hill station nestled at the foothills of the Mullayanagiri range with beautiful climate and coffee estates that adorn the hills. This makes it a popular tourist destination and we got to be one of them in February. No denying the gorgeous climate of the place, the wonderful coffee estates, greenery all around and you could relax the whole day almost doing nothing. A write up will soon follow on our Chikmaglur trip but before that let me bring your attention to this recipe which my mother learned from one of the chef's at the home stay.

Chilly Chutney - goes with almost anything be it rice, idli or dosa and co-incidentally we tried it with foccacia and it was undeniably the best combination (Italy meets Malnadu) which is why we have included it in the photograph. 

So here we go - 


kitchenspells.blogspot.com


Ingredients
  1. Kashmiri red chilli - 15 to18 
  2. Fenugreek seeds - 1/4 tsp
  3. Garlic - 3 to 4 cloves
  4. Jeera/ cumin seeds - 1/4 tsp
  5. Tamarind - 1 lemon size ball 
  6. Jaggery - 2 tbsp grated
  7. Mustard seeds - 1/4 tsp
  8. Salt to taste
  9. Oil
Method
  • Soak tamarind in half a cup of warm water and extract the juice.
  • Soak the red chilly in water for ten minutes and drain off the water.
  • Heat 1 tbsp of oil in a pan and add the fenugreek seeds, cumin seeds,garlic along with red chilli. Fry this until the raw smell of garlic goes away.
  • Take it off the flame and let it cool. Pulse this into a paste.
  • Transfer this back to the pan and add the tamarind extract along with grated jaggery and adjust the salt. Let the water run a little dry to get the desired chutney consistency.
  • Heat oil in a pan, add mustard seeds and let it splutter. Temper the chutney with mustard seeds.
kitchenspells.blogspot.com

You may also note -
  • De-seed the chilli before frying if you do not like the seeds in the chutney.

Sunday, 5 March 2017

Cashew Chicken Roast

My very first attempt at making the humble chicken curry was born out frustration of a year long preparation for the 12th standard board exams which was no less than a nightmare. I remember hunting for a recipe from the old cookbooks and landing on one recipe, although I cant remember the name - it was some sort of a Parsi preparation. My sister till today says nothing can beat the first chicken curry that I made - I have till date not been able to replicate it and neither do I know where that recipe book is. Although the outcome of my first attempt was delicious, I remember using copious amount of oil and just because I was not sure if the chicken was cooked - I vaguely recollect taking it out of the curry, frying it and dropping it back in:) One thing the recipe called for was using cashew paste and I have just done that in this recipe using chicken drumsticks.

Some characteristics just don't die with time - one such is my penchant for chicken legs.  Thank God the chicken has two legs, else Shibin and I would have a hard time deciding who gets the leg piece! Shibin has a equal affinity for the legs too.

So let's get moving to the recipe -

kitchenspells.blogspot.com


Ingredients
  1. Chicken - 8 drumsticks
  2. Turmeric powder - 1/4 tsp for marination + 1/4 tsp
  3. Ginger garlic paste - 2 tsp
  4. Chilli powder - 2 tsp
  5. Shallots - 1 cup chopped
  6. Tomato - 2 medium size
  7. Cashew - 100 gm
  8. Salt to taste
  9. Oil
Method
  • Marinate the chicken drumsticks (skin removed) in turmeric powder, chilli powder, ginger garlic paste and salt. Let it rest for 30 minutes.
  • Puree the tomato.
  • Soak the cashew in water for 15 minutes. Drain and blend the cashew with just enough water to form a smooth paste.
  • Heat oil in a pan and saute the shallots till it wilts. Add the 1/4 tsp turmeric powder, once this is cooked, add the marinated chicken drumsticks. Give this a good mix before adding the tomato puree.
  • Let this cook covered until done. Uncover and let the gravy run dry on high flame.
  • Add the cashew paste and give it a good mix. Let this cook for 2- 3 minutes on medium flame before turning off.
  • Garnish with coarsely pounded cashew.
kitchenspells.blogspot.com

You may also note - 
  • The cashew paste once heated tend to stick on to the vessel. So do not let it cook for long as you may end up scraping out bits and pieces from the vessel.