Showing posts with label Baking Aroma. Show all posts

Wednesday, 19 July 2017

Whole Wheat Honey Oats Bread

Shibin's office shifted about a year back. Earlier, he had to invariably walk through a supermarket twice a day. ( shortcut, instead of having to walk two more blocks and go all the way around the building). Twice a day includes one crawling and the other running - crawling to the office ( everyone crawls in the morning especially during the beginning of the week) and running out of it in the evenings (It is my belief that he ran to meet me :P).

In the process, it is hard to ignore those items that stare at you from the shelves beckoning you to pick them or those that scream out offers  or the ones that flatter you with the lighting .  So atleast once a week, he came home with a treat to my delight. I am still a kid at heart, such treats fascinate me .

Anyways with the shifting of his office to a core business area , there were no more supermarkets to pass through and there went my treats. He comes home empty handed these days!

If you are wondering why I chose to tell this story today, I will not hold you on for long. I have precisely two reasons .

First reason is that, today is Thursday and beginning of the weekend. He is going to be the first person to read my blog !! ( Shibin - this post is a shout out to you that I still love these treats :P)

The second reason is that, it is because of his treats from the supermarket that I tasted honey oats bread for the first time. And ever since then, we have been wanting to make it. We finally did and a whole wheat one too:)

There you go -

Adapted from Bakingdom

kitchenspells.blogspot.com


Ingredients

  1. Wheat flour - 2 and 1/2 cup
  2. Oats - 1 cup
  3. Warm Milk - 1  cup
  4. Honey - 1/2 cup
  5. Egg - 1
  6. Olive oil - 3 tbsp
  7. Instant yeast - 2 tsp
  8. Luke warm water - 1/4 cup
  9. Salt - 1/4 tsp
Method
  • Break open the egg and whisk it well.
  • To this, add olive oil, milk and honey. Stir well to combine.  ( Keep aside 2 tbsp of honey)
  • Mix together the flour, yeast, oats and salt. ( Keep aside 2 tbsp of oats)
  • Add this in batches to the wet ingredients until well combined.
  • Either using a dough hook or hands bring together the dough. If it is too sticky, add 1 tbsp of flour at a time and knead for 5 minutes.
  • Let the dough rest in an oiled and well covered bowl for 2 hours.
  • Knead again, dust the work surface with a little flour while doing this in order to prevent this from sticking.
  • Shape it up into a rectangle, roll it over and place in a loaf pan ( 9 inch). Cover and allow it to raise again for an hour.
  • Meanwhile, preheat the oven at 180 degree centigrade. Keep a pan filled with water at the bottom rack for steaming.
  • Once the dough has doubled, brush the top with honey and sprinkle oats.
  • Bake at 180 degree centigrade for 50 minutes to an hour.
  • Remove and transfer to a cooling rack.
  • Slice and serve with butter or an extra dose of honey.
kitchenspells.blogspot.com

Thursday, 16 March 2017

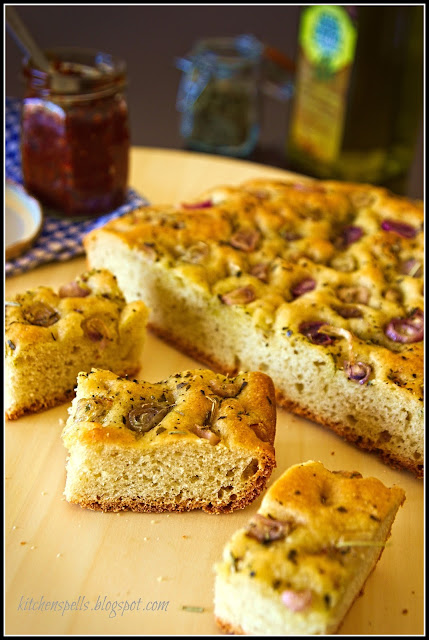
Herbed Focaccia with caramelised shallots

kitchenspells.blogspot.com


I am relatively a beginner in bread baking and this is probably the only bread I have baked more than the fingers on my hand! I tasted focaccia only when I came to Dubai and that was the first time I even heard of it. Back in India, I knew 4 types of bread - white bread, brown bread, multigrain bread and fruit bread - that was my extent of bread knowledge.  I would not label bread baking as difficult - it is only time consuming - so if you have the time in hand - Foccacia is definitely worth a try.

Focaccia is an Italian bread with a generous amount of olive oil - topped with herbs, olives, onions, sun-dried tomatoes or any other vegetables that goes along. Focaccia, I realised recntly makes a good sandwich bread too! I have tried topping with olives , tomato and onions but the best for me was the shallots. It is easier to chop them into cute little rounds - it caramelizes well and the looks quite pretty on the bread too. I read an article today by Nandita Iyer from the Saffron Trail in the Hindu where she outlines the need to eat with your senses and we did just that with focaccia!

kitchenspells.blogspot.com


Ingredients

  1. All Purpose Flour - 1½ cup + extra for dusting
  2. Water - ½ cup warm
  3. Instant yeast - 11 gm sachet
  4. Olive oil - ½ cup (¼ +¼ divided)
  5. Shallots - ¼ cup
  6. Sugar - 3 tbsp
  7. Garlic and Herb seasoning - 1½ tsp
  8. Semolina - 2 tsp
Method
  • Dissolve the yeast and sugar in warm water. Let it rest for 5 minutes.
  • Sieve together the flour and salt into a bowl. Make a well at the center of the bowl and slowly add the warm water mixing it together using a fork.
  • Now add olive oil - ¼ cup in small batches till the dough holds itself together. The dough is going to be sticky at this point.
  • Dust your work surface with a little flour and tip the dough over. Knead for roughly 5 to 10 minutes. The dough should not be very hard to knead, it should be smooth and easy to stretch.
  • Grease a bowl with a little olive oil - cover with a cling film and let it rest for 45 minutes to 1 hour in a warm place to double itself.
  • Meanwhile, chop the shallots into rounds and add a tsp of olive oil to this and give it a good mix.
  • Take a baking tray and sprinkle semolina at the base of the tray. 
  • The dough in one hour would double itself and would have a very smooth texture. Punch it down and tip it over into the tray and firmly press down with your hand to attain the shape of the tray uniformly. Poke into the dough using your finger tips to create random patterns as you can see on the bread .( Trust me it is superb fun to do that!!)
  • Sprinkle the seasoning and spread the shallots over the surface. Give it a light press so that it holds itself to the dough but doesn't insert itself.
  • Sprinkle a little bit of salt all over and be generous with you olive oil on the surface.
  • Cover it with a cling film and let it stand for 45 minutes.
  • Pre-heat your oven to 220 degree centigrade  and place in the tray. Bake for 30 minutes till the top of the bread begins to brown.
  • Remove it from the oven and let it cool for 5 minutes before you dig in you knife:)
  • Focaccia is a breakfast or snack in itself that goes well along with your coffee or tea. The herbs and the olive oil gets infused into the bread and the caramelized shallots give the focaccia a lovely aroma.
  • You could also try this with a chilli chutney which I thought was a lovely combo!
kitchenspells.blogspot.com

You may also note -
  • It is necessary to knead the dough well and leave it for proofing. Ensure that the dough has risen - approximately an hour should do but colder areas may require more time.
  • Usual recipes call for 20 minutes bake time - I got mine done in 30 minutes so keep checking yours to ensure the lovely brown color on top.
  • Avoid opening the oven too many times to check - check at the 20 minute mark first.

Wednesday, 13 April 2016

Lemon Cake with Honey Lemon drizzle

And it is a year already!

This blog was born with little or no idea how long it would sustain but here we are - Our first milestone!
And we intend to attain many more.
It has been a tremendous learning experience all along. We confess that we are not the experts, we experiment, trial and errors along the way and happy successes too.
We have presented our successes to you and learnt from our failures to better the food we present to you in every way.

My gratitude to all my family, friends and everyone of you for the encouragement through your constant likes and comments!

Cheers to one year of happiness through food blogging!

Lemon Cake with Honey Lemon Drizzle - that is our latest fad.

kitchenspells.blogspot.com

Here is the recipe for you -

Ingredients

For the cake - 
  1. All Purpose Flour - 2 cups
  2. Sugar - 1 cup
  3. Vegetable Oil - 1 cup
  4. Egg - 3 no.s
  5. Vanilla essence - 1 tsp
  6. Baking powder - 1 tsp
  7. Lemon zest - 2 lemons
  8. Lemon juice - 2 lemons
  9. salt - 1/4 tsp
For the drizzle - 
  1. Honey - 1/4 cup
  2. Water - 1/4 cup
  3. Lemon juice - 1 lemon
  4. Sugar - 2 tbsp

Method

Pre-heat the oven at 180 degree centigrade for 15 minutes. Keep your baking tray ready by greasing it. Sieve together the flour and baking powder and keep aside.

Take the oil and sugar in a bowl. Break open the eggs into the same bowl and whisk the ingredients together. Pour in a tsp of vanilla essence and once the ingredients have combined well, add the sieved dry ingredients along with salt and fold in the cake mix. 

Zest in two lemons (ensuring that you don't go in too deep) into the batter. Add the lemon juice taken from two lemons and fold this into the cake mix.

Transfer this to the greased cake tray.  Bake it for at 180 degrees till a tooth pick inserted comes out clean.
Baking time varies depending on the size of your oven so keep a tab.

In the meantime, bring together the ingredients for the drizzle - sugar, lemon juice, honey and water. Ensure that the water you use is warm. Mix well to form a syrup.

Prick your cake roughly to form holes for the syrup to seep in. Gently pour the syrup on the cake and let the cake absorb it. Keep the cake covered in a cling film for a day.

Add topping of your choice! We chose to have streaks of whipping cream across the cake as you can see in the photographs.
kitchenspells.blogspot.com

Happy Baking!


Saturday, 11 July 2015

Dates and Walnut Loaf

It is Ramadan season.
Festive display of dates and sweets made of dates fills the supermarkets in Dubai.

So why not something made from dates for Iftar this season.
kitchenspells.blogspot.com


This is my first attempt at making dates loaf and it was a colleague who suggested to add in the walnuts as well for the crunch.  Dates by itself is quite sweet and I wanted to make sure that the loaf does not become extra sweet by regulating the sugar content.

Again, like my most recipes it is simple and quick.
kitchenspells.blogspot.com


Here you are -

Ingredients

  1. Dates - 3/4 cup de-seeded and chopped
  2. Milk - 3/4 cup
  3. All purpose flour - 1 and 1/2 cup
  4. Sugar - 4 tbsp
  5. Egg - 2 no.s
  6. Cinnamon powder - 1 tsp
  7. Baking powder - 1 tsp
  8. Salt - 1/2 tsp
  9. Vanilla essence - 1 tsp
  10. Walnuts - 1/2 cup
  11. Vegetable Oil - 1/2 cup 
  12. Honey - 2 tbsp

Method

Heat the milk with the chopped dates on medium flame for 5 minutes and let it rest.

Sieve together the flour, baking powder,cinnamon powder, salt and keep aside.

Break open the eggs and whisk well. Add sugar and vanilla essence and mix it well.

Fold the dry ingredients into this and add dates, milk and oil. Whisk together the ingredients.

Pre- heat the oven for 10 minutes at 180 degree and grease a loaf tin.  Add  crushed walnuts into the loaf mix and just swirl around with a spoon. 

Transfer the mix into the loaf tin and spread some walnuts on top.

Place the tin in oven and heat at 180 degree for around 30 - 40 minutes. After 25 minutes, take out the loaf tray and glaze the top of the loaf with honey using a brush and place it back inside.

Cook till a pin inserted comes out clean. Transfer it to another surface for cooling. Serve with topping of your choice.
kitchenspells.blogspot.com


You may also note - 
  1. You can increase either the dates quantity or sugar to make it sweeter. We chose to make it less sweeter.


Monday, 4 May 2015

Swiss Roll/Jam Roll

Swiss Roll/Jam roll

Jam roll always reminds me of the summer vacations while we were still at school -a long two month hiatus in Kerala along with my cousins. There was a routine established for the four of us and the most important of it all being the 5 pm wait on our balcony for my aunt to get back from work - for pouncing on the goodies in her bag. She never failed us. 

Jam Roll was my favorite, it always intrigued me. Sometimes I would just bite into it hungrily and sometimes I took the time to unroll it lick away the delicious mixed fruit jam and then dig on the cake. The 'little me' never would have imagined that she would actually be making jam roll one day.

The idea of trying out something like this popped up when we brought orange marmalade. I was tasting it for the very first time and it did not fascinate me much. I had a bottle full of it and did not absolutely want it to rot away. That is when my hubby told me why not try a Swiss roll? I was clueless how this was done. Yet, I decided to try out on a weekend as we were expecting a few guests. I baked the cake for the roll but it was adamant and refused to roll, cracking up when I tried to roll it.  I could not let it go waste. So I decided to sandwich the marmalade between two slices of cake cut into circles and dust it with powdered sugar. It tasted good but the cake had turned out a little harder making the rolling difficult. I decided to research on this a bit more and this time it turned out the way just I had wanted it to.
Swiss Roll/Jam Roll


Honestly, making a jam roll is not complicated as it looks. Just a little bit of patience and there you are.


Ingredients

For the sponge cake-

Self raising flour/Maida - 1 cup
Powdered sugar - 1 cup (3/4 goes into the cake and the rest for dusting)
Eggs - 4 separated
Vegetable oil or butter - 2 tbsp
Vanilla essence - 1 tsp
Baking powder - 1/2 tsp

Marmalade/ Jam/ Cream - flavor of your choice


Preparation
  1. Sift the flour and baking sugar and keep aside.
  2. Separate the egg yolk and white. Whisk the egg white along with a little sugar using a hand blender or electric blender for 7-8 minutes so that it becomes thick.
  3. Add the vanilla essence into the egg yolk and mix it well. 
  4. Into this, add 3/4 cup of the powdered sugar and the egg white. Fold in gently using a spoon or spatula in order to avoid air bubbles.
  5.  Add the sifter flour, fold in the mixture well and finish off with the vegetable oil.
  6. The cake mix is now ready to go into your oven.
  7. Make sure that you pre - heat your oven at 180 degree for 15 minutes. Grease a square baking tray, in case you do not have that, you can use your roasting tray as well. Pour the mix into this and make sure it is evenly spread across.
  8. Place in the oven for 10 - 15 minutes. Keep checking to avoid overcooking or browning of the cake.  
  9. Sponge cake rolled in parchment paper
    Roll the sponge cake while hot along with the parchment paper
    Remove it from the oven once done and invert on top of a parchment paper which has been sprinkled with powdered sugar.( In case, the cake is too thick and you want your rolls to be thinner, you may just slice through the center)             Sprinkling of sugar is important else your cake may stick to the paper.
  10. While still hot, roll the cake along with the parchment paper till the fag end. Tie up the ends to retain the shape and leave it to cool.

11. Once it has cooled down, unroll it spread the jam or marmalade evenly over the entire length and a little thinner towards the sides as the excess may pop out as we roll. Dust the roll with powdered sugar.Roll it back and cut out the rolls into thickness of your choice

Jam Roll
Cut off the ends of the roll where the excess jam has spilled over
Your Jam Roll is ready to be served. Once a while instead of just making a sponge cake, you can layer it with jam and roll it - impressing everyone around you.
Jam Roll


Wednesday, 22 April 2015

Carrot Cake

It all started for Christmas in 2012 when a colleague gave me a cake recipe. The very same day I purchased all the ingredients and made my very first cake. I did not have an oven and resorted to baking the cake in a cooker. ( you need to be careful, you don't use water and gasket and the cooker gets mighty hot). Since then, I have tried a lot of cakes in the cooker. It did turn out tasty but often a little too hard with the bottom and the edges burnt,

I have also tried the traditional method of baking where the cake tray is inserted into a vessel with hot sand generally kept over the traditional chullah. The vessel is then covered with a lid with burning coal on top as well so that the cake gets evenly baked. I was too scared to handle that and it was my mother who was a master in that and me just a by stander.

It was only post marriage in 2014 that I learnt to use an oven to bake cakes. I had no idea about the right temperature nor the timings .After a few burnt and also sometimes under cooked cakes, I do have an approximate idea now.

Initially cake baking was a tedious and tasking job for me - sometimes the cake does not rise, I have too many bubbles in the cake, I have the nuts and fruits settling at the bottom and the top of the cake is not cooked enough where as the bottom is burnt. My husband is a wonderful 'analyser' and I would say 'get it right person'. He often googled up and found solutions to most of my problems.

I have not yet mastered the art of baking and I hope to some day. As of now, I am still learning and correcting as I go along.

Your cakes can turn out right if you learn to love your ingredients and handle them as instructed in the recipes you find across in different sites. For instance - make sure all your ingredients are at room temperature and stick to the measurements provided. Once you have a knack of it, you may try variations.

So let me move on to my carrot cake.

A wonderful evening with Tea, Cake and a Perfect book.


Carrot Cake


Ingredients

All purpose flour/Maida - 2 cups
Powdered sugar - 1 cup ( you may raise it to 1 and a half cup - neither of us have sweet tooth so I generally add lesser sugar)
Egg - 2( if the egg is really small you may add 3)
Buttermilk - 1/2 cup
Oil - 1/4 cup
Cinnamon powder - 2 tsp
Baking powder - 1 tsp
Vanilla extract - 1 tsp
Carrot - 2 grated
Raisins
Cashew nuts
Salt

Preparation


    Carrot Cake
  1. Mix together the dry ingredients in a bowl - flour, powdered sugar, baking powder, salt and cinnamon powder. Sieve it in order to prevent formation of lumps.
  2. Beat the eggs well along with vanilla essence and add in the buttermilk and oil. Combine it well.
  3. Slowly add the dry ingredients to the wet ingredients mixing it well as you add. Do not beat it further, just enough for the ingredients to mix else it may lead to formation of air bubbles.
  4. Add the grated carrot into the cake mix and fold in gently.
  5. Roll in the cashews and raisins in a little flour  and keep aside.
  6. Preheat your oven at 180 degrees for about 10-15 minutes. 
  7. Grease your cake tray with a little oil and dust flour on top of it. Turn the tray upside down and pat away the excess flour.
  8.  Pour your cake mix into the pan and add the nuts and raisins evenly . Just run your spoon across once and cover the cake tray with an aluminium foil. Gently fold in the sides of the foil- no free ends should be sticking out touching the corners of your oven. Covering your cake with foil allows the top of the cake to be uniformly heated and baked.
  9. Place your tray in the oven at temperature of 180 degree. Check your cake after 20 minutes. Insert a tooth pick or pin and if it comes out clean your cake is ready. Else keep it for 10-15 more minutes. The cooking time may vary depending on the tray you use and the consistency of your mixture. The ideal time would be somewhere between 20 to 35 minutes. My carrot cake took about 25 minutes.
  10. Once baked , remove the cake from the cake and let it cool before your slice and have your first bite.
Enjoy every bite of your cake with steaming tea!!