Showing posts with label Snack-allures. Show all posts

Saturday, 27 January 2018

Avalose Podi ||Cooking with family and friends - #6||

My sister was a picky eater. I have no choice but say 'was' because this time around when she came to Dubai I saw the 'pickiness' ( not too sure there is even a word as such) changing. It was not just her being picky but she hardly ate. Her favorite was chapati with chicken gravy ( she never touched the chicken in it though) So my Dad thought there is one easy girl to manage not much expenses on her food. This was until she grew up and then all she wanted to eat was non-veg food:) The hungriest time of the day was the gap between rushing from school at 4.30 pm ( read after throwing the shoes one under the cot and another under table, socks on the dining table and school bag on the sofa) and the play time which started at 5. We always rejected the option of left over morning puttu ( steamed rice cakes) for evening snack time. But our mother had her way. She would sprinkle a generous amount of sugar, mash in the bananas and feed us. That did taste out of the world - a dish we did not want to dig our hands into tasted so great when she fed us with love. That is how I love puttu even today as for my sister this is how she eats puttu - sprinkle sugar on puttu, eat a handful of that and then take a bite of the banana. When asked about her new style of eating, she says that she mixes and eats it only when mom is around to mash the banana in for her and she doesn't want to dirty her hands doing it herself.

kitchenspells.blogspot.com

Today's recipe is a dish that is eaten in the exact same way as puttu - sprinkle some sugar and mash in the ripe banana. It is usually eaten as a snack but hey, you could make it a breakfast dish too when you really do not want to cook anything else in the morning. I have done that:)

This is my 6th post in the series of Cooking with Family and Friends - this time around with my mom. We made this during my vacation in October to India. Also makes me think it is high time I post something that Shibin and I cook together on this series:)


kitchenspells.blogspot.com


Ingredients

  1. White Rice - 3 cups
  2. Coconut Grated - 2.5 cups
  3. Cumin seeds - 1 tbsp
Method
  • Wash and soak the rice in warm water for 3 to 4 hours
  • Drain off the water and spread the rice on a kitchen towel until it is completely dry. This takes about an hour
  • Dry grind the rice to powder
  • Add coconut and cumin seeds  to the rice powder and mix it thoroughly using your hands. 
  • Press this down tightly and keep this covered for an hour
  • Roast this in a wide pan until the color begins to turn to light brown. Roast in batches in case you do not have a wide pan.
  • Always keep on low flame and using a spatula keep moving the mix around so that it cooks evenly and does not stick onto the bottom of the pan. This process may take about 30 to 40 minutes. ( bit of work for your hands but totally worth it)
  • Let it cool and grind it to powder consistency. Sieve it and grind again until all the particles gain the same consistency
  • Store in an air tight container. It lasts outside for a month to two and if refrigerated longer.
  • Avalose podi is usually served with a sprinkle of sugar with banana mashed into it.

Saturday, 13 January 2018

Ulli Vada/ Onion Vada

Wishing you all a very Blessed New Year!

It is the 14th of the month and I hope you are still sticking to your resolutions that have a tendency to lose momentum as the month goes along! I have not made myself any strict resolutions but I hope to be better and do good more than I could in 2017. I have had a happy 2018 so far and I hope and pray that all of you did too:)

Having said that, certain things do not seem to be changing in 2018! It took me 14 days to get a post out for new year and a long pending post which was shot last March along with the Crispy Sweet Corn and was idling away in the drafts. It took a weekend get together were I made the ulli vada again that I got reminded of my pending post. So here we go with the post.  Its called Ulli Vada down south of India - it could be roughly translated as onion pakoda, onion fritter or onion bajji - depends on which part of the globe you are from! Some recipes call for the use of all purpose flour - I have used gram flour and added a bit of rice flour and baking soda to crisp it up. Baking soda is completely avoidable if you intend to stay clear of it.  

It is easy, quick and perfect for the weather Dubai has now!

kitchenspells.blogspot.com

Ingredients

  1. Onions - 3 medium size ( thinly sliced)
  2. Gram Flour - 1/4 cup
  3. Rice Flour - 1 tsp
  4. Chilly powder - 1 tsp
  5. Coriander leaf - 2 tbsp finely chopped
  6. Curry leaf - 1 tbsp finely chopped
  7. Baking soda - 2 pinches
  8. Water - as required.
  9. Salt to taste
  10. Oil for deep frying
Method
  • Take the sliced onions, corriander leaves, curry leaves and salt in a bowl. Mix them well squishing the onions as you go to separate the strands and also release water.
  • Add gram flour, rice flour, baking soda and chilly powder to this. Mix them well using your hand, the water released from the onions helps in binding the dry ingredients together. Add 3 to 5 tbsp of water as needed in the batter. The batter needs to be thick and not runny.
  • Heat oil in a pan. Scoop out a small ball of the batter and flatten it on your palms before dropping it into the oil. Fry on both the sides till evenly browned.
  • Transfer onto a tissue to drain off excess oil. Serve with hot tea.
kitchenspells.blogspot.com

You may also note
  • When deep frying, it helps to keep flame on medium to medium high - absorbs lesser oil. 
  • Always drop in the batter only when the oil has heated up. Test by dropping in a tiny drop of the batter.

Friday, 6 October 2017

Fish Cutlet

Time flies by in Dubai - yet another winter is peaking over the horizon. I love winters. If only I could do away with the occasional flu that tends to interrupt the weekend outing plans. We are done with the first flu of the winter which I would like to call the 'change of season flu' that has so become ingrained in our lives for the past three years. Looking forward for a blissful few months that includes a vacation home and not to forget the impending festival season.


On that note, we head over to the new recipe on the blog - Fish cutlet. The type of fish you choose is absolutely your choice - the lesser the bones the easier the task of mincing it. Cutlets can make your weekday dinner cooking a little easier. Just prep a batch over the weekend and freeze it!

Here goes the recipe - 


kitchenspells.blogspot.com


Ingredients
  1. Fish - 1 kg
  2. Potato - 2 medium sized
  3. Ginger - 1 tbsp grated
  4. Green chilli - 4 to 5 finely chopped
  5. Onion - 2 medium finely chopped
  6. Turmeric powder - 1/2 tsp
  7. Pepper powder - 1 tbsp + 1 tsp
  8. Egg - 2 beaten
  9. Bread crumbs
  10. Salt to taste
  11. Oil for frying
Method
  • Clean and pat dry the dry the fish. Marinate the fish in turmeric powder, salt and pepper (1 tbsp). Steam the fish until cooked through.
  • Let the fish cool and separate the flesh from the fish bones. Using fingers crumble it to smaller flakes/ mince them and set aside.
  • Boil potatoes in water. Skin them and mash them coarsely.
  • In a pan, heat oil and add the onions. Let it sweat before adding in the ginger and green chilly. Saute till the ginger is cooked well.Add in required salt and pepper powder.
  • Add the minced fish to this masala and give it a good mix. Turn off the flame and add the mashed potato. Mix them well.
  • When it is warm enough to handle. Roll them into desired shape.
  • Freeze them for about half an hour.
  • Dip them in beaten egg and roll in the bread crumbs so that it is coated well.
  • Freeze them for atleast half an hour before frying.
  • You could either deep fry the cutlets or shallow fry them until golden brown and crisp on both the sides.
You may also note - 
  • Ensure to freeze them for a while before frying, it helps the bread crumbs to stick on.
  • Ensure the oil is hot enough before dropping in the cutlets, lest they tend to separate.
  • The cutlets once rolled in bread crumbs can be frozen up to 2 weeks.

Saturday, 15 July 2017

Caramelised Banana| Banana Ghee Roast|Ethekka Nei Roast


kitchenspells.blogspot.com

If you are a malayalee, then you must be quite familiar with the Kerala Banana which is an integral part of a malayalee household. Breakfast, lunch or even snacks, if you love them, you always have a way incorporate it into your food. Raw banana is thinly sliced and fried to make the popular Kerala banana chips( yes, the very same chips you ask your malayalee friend to get when they come back from their vacation). The ripe banana is good eaten as is or if you do not like the taste there are always ways to modify it. Crisp it up by battered deep frying it, make payasam for your sadya, halwa, kaipola, pullisery, unnakkaya and a healthier option of simply boiling it or jazz it up with a little butter and sugar. If you are looking for something quick with minimal ingredients, then this is the recipe for you - a frequent dish at our place be it breakfast or evening snacks.

kitchenspells.blogspot.com

Here you go -

Ingredients

  1. Banana - 2
  2. Ghee - 2 - 4 tbsp
  3. Sugar - 1 tbsp
Method
  • Slice the bananas into three equal parts and slice them into three or four slices along the length.
  • Heat ghee in a pan and place these slices in the pan. Once the color of the banana turns a darker yellow and begins to brown slightly, flip them over and cook until done.
  • Transfer to a plate and sprinkle sugar. Serve warm with a cup of coffee.
You may also note - 
  • Use a properly ripened banana. Overripe bananas are not suitable to be used as it will not hold together and will be hard to flip over.
Other banana recipes on the blog - 

Saturday, 8 July 2017

Cantucci ( Prato Biscuits)| Italian Almond Cookies

I have already written two parts of our Italy travel ( if you have missed it, you can always find it here). After every travel, as a tradition we publish a recipe from that region. So before moving onto the third segment of our travelogue, we have for you a dish that we learnt as a part of cooking class in Tuscany.

kitchenspells.blogspot.com

Cantucci is a type of biscuit that is double baked to get the crunchy exterior. However you could also choose to have the softer version by avoiding the second bake and that is totally up to you. It is commonly a dinner dessert in Italy paired with wine. For us, it simply formed our tea time snacks. The recipe isn't all that time consuming and can be whipped up in under an hour or may be even lesser. I have to admit the end product was simply hard to take hands off from - you just end up going back for more.

Here is the recipe for you.
Recipe courtesy - Elizabetta, La Guida Farm House, Sinalunga, Italy

kitchenspells.blogspot.com

Ingredients

  1. All purpose flour - 500 gm
  2. Sugar - 200 gm ( +50 gm for more sweetness)
  3. Butter - 150 gm 
  4. Whole almonds - 200 gm
  5. Egg - 3 no.s + 1 egg yolk
  6. Baking powder - 1 tsp
  7. Cinnamon powder - 1 tsp
  8. Salt - 1 pinch
Method
  • Pre-heat the oven at 180 degree centigrade for 15 minutes.
  • Melt the butter. Whisk well 3 eggs and combine this with butter and sugar. 
  • Sieve together the dry ingredients - flour, salt, baking powder and cinnamon powder.
  • Combine this with the wet ingredients. Using a spatula, combine the batter well.
  • Add the whole almonds and incorporate it well into the batter.
  • Line a baking tray with parchment paper, divide the dough into three equal parts and place them on the tray. Mold them into cylindrical shape using your hands. Ensure that there is enough space between the three cylinders that you make since it tends to rise and spread a little on baking. It may join together if there is not enough space( like mine did because I left it a little too close.) Since whole almonds have been added, you may have a few sticking out, gently insert them into the surface.
  • Brush well the outer surface with egg yolk.
  • Bake for 15 to 20 minutes.
  • Take it out of the oven and let it cool. Slice them once it has cooled down. You can have it two ways - as is or let it bake for another 5 minutes after it has been sliced to get a crunchy and a bit more harder texture.
  • Traditionally in Italy, the Cantucci is dipped in vine and had as a dessert. Well, you can totally have yours with coffee/ tea too:)
You may also note - 
  • Ensure all the components are at room temperature.
  • Be wise with your oven temperature - may have slight variations depending on the type of oven that you use.
  • Also, use medium sized eggs. Larger eggs make the batter a bit runny and would not hold cylindrical shape.

Monday, 12 June 2017

Irachi Petti - Malabar Iftar recipe

I always knew of Ramadan but it is only after moving to UAE, I realised how religiously it is observed and what iftar and suhoor mean! The world of blogging introduced me to a lot of Malabar snacks mostly fried but really mouth watering. I tend to stay away from deep fried stuff, primarily because I have pimples popping on my face as soon as I relish on anything fried. Since it is shorter office timings during Ramadan, my husband one day happened to come home with some snacks that he picked up from the local Kerala cafeteria for our evening tea together (that is a rarity too - happens only during Ramadan). It was all deep fried stuff and I could not resist it - pakoda, samosa, irachi petti, chatti pathiri, mulagu bajji, ulli vada. It was all there. I waited for two days after we had this - Yay! No pimples and that made my resolution to prepare a fried malabar snack stronger.

That is how I ended up making irachi petti with the minced meat I had in the fridge. Irachi means meat and petti means box. So basically this dish has meat filling that is sealed in a box made of crepe!
So here is a recipe to try this Ramadan!

kitchenspells.blogspot.com

Ingredients

For the filling

  1. Minced meat - 400 gms (beef, mutton or chicken)
  2. Onion - 3 medium finely chopped
  3. Ginger - 2 tbsp
  4. Garlic - 2 tsp
  5. Green Chilli - 3 finely chopped
  6. Pepper powder - 1 tsp
  7. Turmeric powder - 1/4 tsp
  8. Coriander powder - 1 tbsp
  9. Garam masala - 1 tsp
  10. Lime juice - 1 tbsp
  11. Salt to taste
  12. Oil
For the crepe
  1. All purpose flour - 1 cup
  2. Egg - 1 beaten
  3. Salt to taste
  4. Water as needed
For coating
  1. Egg - 1 beaten
  2. Bread crumbs
  3. Oil
Method
  • Heat oil in a pan. Fry the onions until it softens and add the ginger, garlic and green chilly. Saute till the raw smell disappears.
  • Add the turmeric powder, corriander powder and pepper powder. Cook the masala and add the minced meat. Mix it well to coat.
  • Add salt and keep it covered until it is cooked. Adjust salt if need be and add lime juice. Turn off the flame.
  • Prepare the crepe batter by mixing together the flour, egg, water and salt in a bowl. Add water as needed to form a runny batter.
  • Heat a tawa and pour a laddle full of batter onto the hot tawa. Ensure that the flame is on medium and prepare the round crepe by running the laddle in a circular pattern on the batter.
  • Flip over once and cooked gently. Do not let it get crisp as it might break open while placing the filling.
  • This batter makes around 8 crepes.
How to fill the crepe and fry
  • Take one of the crepe and place two spoonful of filling on the center of the round crepe. Using the same spoon adjust the filling to form either a square shape or a rectangle shape. This is done just to make the irachi petti hold the shape.
  • In order to cover the filling, first fold over one side towards the top of the filling, such that the bend in the fold is at the point where the filling ends.Repeat the same with the opposite side.
  •  Now fold the other two ends one at a time thereby sealing the filling in ( may form a square or a rectangle shape). It is always better to have larger crepes made so that the folding is easy and it stays. Smaller folded flaps tend to open up while cooking.
  • Place this on a plate with the folded flaps facing down. Repeat the same with other crepes.
  • Heat oil in a pan,  Dip each of the petti in the beaten egg and coat it with bread crumbs. Then place the petti in the pan with the flap side facing down. Cook till it browns well on one side and then flip over.
  • Serve hot !!
kitchenspells.blogspot.com

You may also note
  • You may add corriander leaves to the meat filling.
  • Once the crepe has been folded always place it with the flap facing downward so that the weight tends to hold the flap in place.
  • I prefer shallow frying but you may also deep fry it.


Wednesday, 22 March 2017

Crispy Sweet Corn

kitchenspells.blogspot.com

I keep saying that every dish has a story behind it and Shibin says every photograph should tell a story. So we definitely have a 'Once upon a time' in this dish and a 'happily ever after' too.

Most of us have heard of Barbeque Nation and have atleast been there once to satiate our barbeque cravings.What you probably did not know was this restaurant chain is owned by Indore based Sayyaji Hotel. I was fortunate enough to spend two days here and that is where my love affair with crispy fried sweet corn started. I have tried making this snack couple of times - but never achieved success till about two weeks back. This definitely does not meet BBQ Nation standards but still we loved it this way.
Last week, we had a family over for dinner and we spent most of the time playing carroms. The need for a quick snack at the carroms table was what reminded me of this recipe. It turned out crispy as I wanted it to and that led me to making it again the very next day for the blog. That is when Shibin suggested that we make it a snack for our evening trip to the beach and photograph it there. For him, this seemed an ideal picnic snack and where better than a trip to the beach. We had some fun time creating those cones too - super fun to see Shibin trying to create cones and ending up with huge ones that would hold almost  a 1 kg of the kernels:P Some childish crafting at work:) Blogging is fun!

kitchenspells.blogspot.com


Here is the recipe -

Ingredients

  1. Sweet Corn kernels - 1 cup
  2. All Purpose Flour - 3 tbsp
  3. Corn Flour - 3 tbsp
  4. Chilli powder - 1 tsp
  5. Onion - 1 finely sliced
  6. Coriander leaves - 2 tbsp finely chopped
  7. Water - 2 tbsp
  8. Salt to taste
  9. Oil
Method
  • Mix together all purpose flour, corn flour, chilli powder and salt.
  • In a bowl, use your hands to mix together the dry ingredients with the sweet corn kernels.
  • Sprinkle 2 tbsp water on this and give a firm mix so that the batter holds on to the kernels.
  • Heat oil in a deep pan and test by dropping one kernel into it. It has to crackle and rise to the top.
  • Keep the flame on medium throughout and once the oil is ready, drop a handful of kernel into it. Let it fry and rise to the top.
  • Drain excess oil on tissue paper.
  • Transfer to a bowl, add chopped onions and coriander leaves. Sprinkle a little chilli powder and give it a good toss.
  • An easy snack for those lazy evenings.

You may also note - 
  • Fry as soon as you make the mix, do not let it rest for too long as it tends to get a little soggy and will end up holding kernels as a bunch and not as individual ones.

Thursday, 16 March 2017

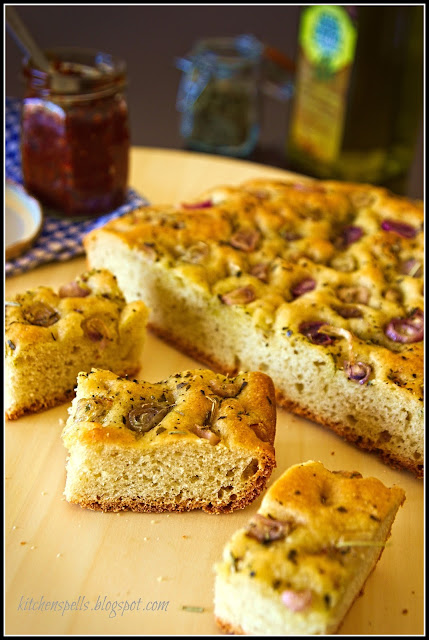
Herbed Focaccia with caramelised shallots

kitchenspells.blogspot.com


I am relatively a beginner in bread baking and this is probably the only bread I have baked more than the fingers on my hand! I tasted focaccia only when I came to Dubai and that was the first time I even heard of it. Back in India, I knew 4 types of bread - white bread, brown bread, multigrain bread and fruit bread - that was my extent of bread knowledge.  I would not label bread baking as difficult - it is only time consuming - so if you have the time in hand - Foccacia is definitely worth a try.

Focaccia is an Italian bread with a generous amount of olive oil - topped with herbs, olives, onions, sun-dried tomatoes or any other vegetables that goes along. Focaccia, I realised recntly makes a good sandwich bread too! I have tried topping with olives , tomato and onions but the best for me was the shallots. It is easier to chop them into cute little rounds - it caramelizes well and the looks quite pretty on the bread too. I read an article today by Nandita Iyer from the Saffron Trail in the Hindu where she outlines the need to eat with your senses and we did just that with focaccia!

kitchenspells.blogspot.com


Ingredients

  1. All Purpose Flour - 1½ cup + extra for dusting
  2. Water - ½ cup warm
  3. Instant yeast - 11 gm sachet
  4. Olive oil - ½ cup (¼ +¼ divided)
  5. Shallots - ¼ cup
  6. Sugar - 3 tbsp
  7. Garlic and Herb seasoning - 1½ tsp
  8. Semolina - 2 tsp
Method
  • Dissolve the yeast and sugar in warm water. Let it rest for 5 minutes.
  • Sieve together the flour and salt into a bowl. Make a well at the center of the bowl and slowly add the warm water mixing it together using a fork.
  • Now add olive oil - ¼ cup in small batches till the dough holds itself together. The dough is going to be sticky at this point.
  • Dust your work surface with a little flour and tip the dough over. Knead for roughly 5 to 10 minutes. The dough should not be very hard to knead, it should be smooth and easy to stretch.
  • Grease a bowl with a little olive oil - cover with a cling film and let it rest for 45 minutes to 1 hour in a warm place to double itself.
  • Meanwhile, chop the shallots into rounds and add a tsp of olive oil to this and give it a good mix.
  • Take a baking tray and sprinkle semolina at the base of the tray. 
  • The dough in one hour would double itself and would have a very smooth texture. Punch it down and tip it over into the tray and firmly press down with your hand to attain the shape of the tray uniformly. Poke into the dough using your finger tips to create random patterns as you can see on the bread .( Trust me it is superb fun to do that!!)
  • Sprinkle the seasoning and spread the shallots over the surface. Give it a light press so that it holds itself to the dough but doesn't insert itself.
  • Sprinkle a little bit of salt all over and be generous with you olive oil on the surface.
  • Cover it with a cling film and let it stand for 45 minutes.
  • Pre-heat your oven to 220 degree centigrade  and place in the tray. Bake for 30 minutes till the top of the bread begins to brown.
  • Remove it from the oven and let it cool for 5 minutes before you dig in you knife:)
  • Focaccia is a breakfast or snack in itself that goes well along with your coffee or tea. The herbs and the olive oil gets infused into the bread and the caramelized shallots give the focaccia a lovely aroma.
  • You could also try this with a chilli chutney which I thought was a lovely combo!
kitchenspells.blogspot.com

You may also note -
  • It is necessary to knead the dough well and leave it for proofing. Ensure that the dough has risen - approximately an hour should do but colder areas may require more time.
  • Usual recipes call for 20 minutes bake time - I got mine done in 30 minutes so keep checking yours to ensure the lovely brown color on top.
  • Avoid opening the oven too many times to check - check at the 20 minute mark first.

Thursday, 9 March 2017

Chilli Chutney

Karnataka has been my home until I moved to Dubai two years back. Brought up in a small town called Brahmavar in Udupi district and then completed my post graduation and experienced my first feel of corporate life in Bangalore. These are two unique places with its own charm. Karnataka has it all - from the coastal stretch of Mangalore - Gokarna to the mountainous charms of Coorg and Sakleshpur, not to forget the temple towns of Belur, Halebidu , Hampi and Bangalore - the silicon city of India. I have not yet traveled all these places but one day, I do wish to strike off all these from my bucket list.

Chikmaglur is one such beautiful hill station nestled at the foothills of the Mullayanagiri range with beautiful climate and coffee estates that adorn the hills. This makes it a popular tourist destination and we got to be one of them in February. No denying the gorgeous climate of the place, the wonderful coffee estates, greenery all around and you could relax the whole day almost doing nothing. A write up will soon follow on our Chikmaglur trip but before that let me bring your attention to this recipe which my mother learned from one of the chef's at the home stay.

Chilly Chutney - goes with almost anything be it rice, idli or dosa and co-incidentally we tried it with foccacia and it was undeniably the best combination (Italy meets Malnadu) which is why we have included it in the photograph. 

So here we go - 


kitchenspells.blogspot.com


Ingredients
  1. Kashmiri red chilli - 15 to18 
  2. Fenugreek seeds - 1/4 tsp
  3. Garlic - 3 to 4 cloves
  4. Jeera/ cumin seeds - 1/4 tsp
  5. Tamarind - 1 lemon size ball 
  6. Jaggery - 2 tbsp grated
  7. Mustard seeds - 1/4 tsp
  8. Salt to taste
  9. Oil
Method
  • Soak tamarind in half a cup of warm water and extract the juice.
  • Soak the red chilly in water for ten minutes and drain off the water.
  • Heat 1 tbsp of oil in a pan and add the fenugreek seeds, cumin seeds,garlic along with red chilli. Fry this until the raw smell of garlic goes away.
  • Take it off the flame and let it cool. Pulse this into a paste.
  • Transfer this back to the pan and add the tamarind extract along with grated jaggery and adjust the salt. Let the water run a little dry to get the desired chutney consistency.
  • Heat oil in a pan, add mustard seeds and let it splutter. Temper the chutney with mustard seeds.
kitchenspells.blogspot.com

You may also note -
  • De-seed the chilli before frying if you do not like the seeds in the chutney.

Saturday, 18 February 2017

Chutney Cheese Sandwich

Every vacation has three phases - 

  • The waiting phase - You have planned your vacation, arrangements have been made, you are on a shopping spree, you are texting your relatives and friends on your upcoming vacation plans, you are clearing your fridge and finally packing your bags. To add on - I do an additional cleaning of the house because I love to see the house clean and neat on my return! This is an exciting phase and the feeling that you have something bright to look forward to makes even the most daunting task enjoyable.
  • The actual vacation - this is the fun part. Your waiting is over and here it is finally - the execution of all that you planned. Meeting family, friends and relatives - lots of nostalgic moments, being pampered by family until the day it is time to pack your bags and return.
  • The vacation hangover - the most annoying phase that comes after your vacation. The feeling of emptiness, a vague sense of nothing to look forward to, a weariness to get back to track, a derisive resolution to lose the holiday weight , yada - yada! Here even the most simple task seems a truckload.
It is phase three for me now - vacation hangover mode. While I was happy to enter into a clean and neat house - the happiness did not last long. I am bemused on how a house closed for 2 weeks can gather so much of dust!!

It has been 24 hours since my return to Dubai and I have only entered kitchen to make a coffee for myself this morning! I have 2 unpacked suitcases in front of me as I write this ( removed only the food items to be refrigerated - can't lose that, Can I ?), a dirty balcony to clean up, nothing to eat for lunch except thoughts on what I should cook and a whole lot of laziness that stops me from getting up from this couch and doing something!

So while I figure out how to get over the vacation hangover phase - Why don't you guys take a look at the new recipe made and clicked during the waiting phase while clearing the refrigerator!!


kitchenspells.blogspot.com


Ingredients

(makes 4 sandwiches)
  1. Mint Leaves/ Pudina - a fistful
  2. Coconut - 1/2 cup freshly grated
  3. Ginger - 1/2 tsp chopped
  4. Salt to taste
  5. White Bread/ Sandwich bread - 8 slices
  6. Cheese slices - 4
Method
  • Pulse together the mint leaves, coconut and ginger along with salt. Add 2-3 tablespoon of water to attain the consistency required for easily spreading it on the bread slice.
  • Slather about a tablespoon of chutney on the bread and top it with the cheese. Seal it off by placing another bread slice on top.
  • Toast the sandwich on your tawa or a sandwich maker. Serve this hot!
kitchenspells.blogspot.com

Check out other sandwich recipe on the blog.

Monday, 6 February 2017

Vermicelli Upma/ Semiya Upma


It is vacation time and for the first time blogging from a place other than home in Dubai. It feels good to be home and lot of changes have happened in a year - our family of doggies grew from 2 to 3, trees have been replaced by roads and places are beyond recognition, the bakery with my favorite egg samosa seems to have closed down, swipe machines have appeared even at the smallest of stores - demonetisation effect and yet the Gudbud ice cream tastes heavenly except for the increasing price and the decreasing glass size!!

While I feast on my mom's food and savor every moment - why don't you guys virtually feast on the recipe from my archives - Vermicelli Upma. I love the sweetness of this and for me it goes well even without a chutney. Ghee enhances the flavor and peanuts adds the crunch. So here we go - 


kitchenspells.blogspot.com


Ingredients

(Serves - 2)
  1. Vermicelli - 1 cup
  2. Water - 1 cup
  3. Mustard seeds - 1/2 tsp
  4. Urad dal - 1 tsp
  5. Chana dal - 1 tsp
  6. Curry leaf - 1 sprig
  7. Onion - 1 small chopped
  8. Green Chilly - 1
  9. Ginger - 1/4 tsp chopped
  10. Carrot - 4 tbsp chopped
  11. Peanuts - 2 tbsp
  12. Cashewnut - 1 tbsp
  13. Raisins - 1 tbsp
  14. Sugar - 1 tbsp heaped
  15. Salt
  16. Ghee
Method
  • Heat a skillet and add 2 tbsp of ghee. Fry the peanuts, cashew nuts and raisins separately and set aside on kitchen towel to drain excess ghee.
  • In the same skillet, add the mustard seeds and let it splutter.
  • Add the urad dal and chana dal. Once this browns add the curry leaf as well.
  • Now, add the chopped onion along with the ginger and green chilly and cook until the onions are done.
  • Add the chopped carrots along with the vermicelli and cook it for about a minute and half before adding water.
  • Adjust salt at this stage and a tablespoon of sugar for the sweetness.
  • Cook until done. Add the nuts and raisins at this stage and give it a good mix.
  • Serve along with coconut chutney.
kitchenspells.blogspot.com


You may also note
  • Cooking time of vermicelli depends largely on the type that you buy. I used the thin one which got cooked quite fast uncovered.
  • You may use coriander leaf for the final garnish.

Monday, 23 January 2017

Caribbean Plantain Fritters

Sue's Kitchen in Bangalore is a popular Caribbean restaurant. It was for a team lunch that I stepped in there for the first time in December couple of years back. It was a small yet cozy place and I fell in love with the food. I was intrigued by the similarity of the Caribbean food to the Kerala cuisines. The buffet spread was decent and the variety amazed me. I was particularly fond of the pan fried plantains. It is something that we often make at home - yet I simply could not resist going back for more.

So on those lazy days when I sit back and wonder what to do with time in hand - I have flashbacks of some wonderful moments and Sue's Kitchen happened to be one of them. I had plantains and I wanted it to be Caribbean. So off I set on a internet search and came up with the fritters recipe. The basic difference I have incorporated is steaming of the plantains and cooking on tawa without deep frying it.  It is definitely a hassle free recipe and would make a good snack time recipe. So here we are - 


kitchenspells.blogspot.com

Ingredients
( Serves - 4)
  1. Plantain - 2 ripe
  2. All purpose flour - 1/2 cup
  3. Milk - 1/4 cup
  4. Nutmeg powder - 1/8 tsp
  5. Cinnamon powder - 1/4 tsp
  6. Sugar - 1 tsp 
  7. Salt to taste
  8. Ghee
Method
  • Steam the plantains skin on until soft and let it cool.
  • Remove the skin and mash it using a fork adding 1 tbsp of sugar into it.
  • Sieve the flour, salt, nutmeg powder, cinnamon powder and set aside.
  • Now add the milk and give it a good whisk 
  • Slowly add the dry ingredients in batches until well combined. The batter would be thicker than the pancake batter.
  • Heat a tawa and grease it with ghee ( oil also will do, personally I feel that ghee goes along perfectly well with plantains.) Ensure that the flame is on low throughout the cooking.
  • Wet your hands and scoop out a lemon sized ball. Place it on the tawa and press it with your hands to get into a round shape. Alternatively scoop using a laddle and press it down onto the tawa. The second method gave me inconsistent shapes and hence I began using hands for the process. Give it about a minute to cook on one side and flip it over.
  • Serve it with honey, peanut butter or even jam.
kitchenspells.blogspot.com


You may also note
  • Caribbean recipes call for deep or shallow frying. To reduce the oil consumption I used a tawa - you could opt for frying it.

Sunday, 15 January 2017

Udupi Bread masala

New Year started on a pretty low note. Climate is amazing here in Dubai and so very apt for all sorts of infections! So after two weeks of medicines and rest, we are slowly getting back on track. 

Phew! finally food tastes like food! 
Two weeks almost made us forget what it was like to be foodies with our tongues absolutely losing its sense for taste. The beginning of a New Year went by and our third wedding anniversary too confined within blankets and cup after cup of ginger tea! Since it did not exactly feel like a New Year - we decided to postpone all our celebrations till we were fine and we are on the verge of recovery now. Now, I do wish we could have posted about a dinner date or romantic outing on our anniversary but never mind we did something special too! We took care of each other:) It is not easy having two sick people taking care of each other but we did tide through proving true the marriage vows we took three years back - 'In sickness and in health'! 

So while we are just beginning our new year celebration - why don't you guys quickly skim through the recipe we have for you. It has been a while since I have been to Udupi and in less than 3 weeks I am going to be there! So here is a Udupi recipe - made popular by the famous Diana Hotel.

kitchenspells.blogspot.com

Ingredients
(Serves - 3)
  1. White Bread - 8 slices
  2. Mustard seeds - 1/4 tsp
  3. Onion - 2 medium sized finely chopped
  4. Tomato - 1 big
  5. Ginger - 1 tsp chopped
  6. Garlic - 1 tsp chopped
  7. Green Chilly - 1
  8. Kashmiri chilly powder - 1 tsp
  9. Cloves - 2
  10. Cardamom - 2
  11. Cashew nuts - 8-10 pieces
  12. Milk - 1 cup
  13. Coriander leaves 
  14. Salt to taste
  15. Ghee
Method
  • Grind the ingredients listed from 4 to 11 into a fine paste.
  • Chop the bread slices into smaller squares or any random sizes.
  • Heat a tbsp of ghee in a skillet and add the mustard seeds. Once this pops, add the onions and saute until cooked.
  • To this, add the ground paste and cook until the raw smell of the masala goes away.
  • Adjust the salt at this stage and add milk. Bring it to a boil and simmer for a minute before switching off the flame.
  • Add the bread pieces in batches and combine well. Sprinkle corriander leaves and drizzle a tablespoon of ghee before serving it.
kitchenspells.blogspot.com

You may also note - 
  • Ideal for breakfast or evening snacks. You could make the gravy ahead of time and store it. Mix the bread pieces only before your serve else it may become too soggy and melt into the gravy.
  • Alternatively, you could also toast the bread with a little butter before adding it to the gravy for the crunch.
  • While serving it as snack you could garnish with finely chopped onion as well or even spring onions.

Friday, 9 December 2016

Whole Wheat Banana Chocolate Muffins

kitchenspells.blogspot.com


It has been long since I played the game of Secret Santa - I am sure most of you are familiar with this game. It is not the gifts you wrap or unwrap that gives the happiness. It is more about the suspense, the secret letters and the guessing games as to who could be your Santa. I was introduced to this game when I was in hostel where every year we religiously play  - we did have our semester exam during this time of the year but that never dampened our spirits. Nothing could possibly be a hindrance to this game when you have a whole hostel - 100 odd girls playing this game. We had a letter box where we could drop in letters addressed to our secret friend. The thrill of finding a letter addressed to you or small gifts that would mysteriously appear on your bed or a messenger getting it for you. Aah!  Shopping for the gifts weren't easy either. It was always last minute purchases and all the 100 girls end up at the same store every time. We had to dodge our secret friends in the store to get across to buy gifts for them. Aah! Those were the small joys of Christmas.

I wonder as we begin to grow older, do we stop ourselves from enjoying those tiny little things we once enjoyed. So why not this Christmas try to relive your favorite memories - age is after all just a number. May be its a game of Secret Santa or going caroling or baking - let us grow younger this Christmas!

Over to my Christmas recipe - an easy to make muffin with lesser greased utensils. All the combining is done in one bowl - so what are you waiting for - hurry over and try this

kitchenspells.blogspot.com


Ingredients
(makes 10 muffins)

  1. Ripe Banana - 1/4 cup mashed
  2. Butter - 1/4 cup melted
  3. Brown sugar - 1/4 cup
  4. Egg - 1
  5. Wheat Flour - 1 cup
  6. Baking powder - 1/2 tsp
  7. Baking soda - 1/4 tsp
  8. Cocoa powder - 1 tbsp heaped
  9. Salt 
Method
  • Pre-heat the oven to 180 degree centigrade
  • Sieve together the dry ingredients - Wheat Flour, cocoa powder, baking powder, baking soda and salt
  • Take the mashed banana in a bowl and add the brown sugar and butter
  • Break open an egg into this and add the vanilla essence and fold well to combine
  • Now incorporate the dry ingredients in batches and mix well as you go
  • Line your muffin tray with muffin cups or parchment paper and scoop out the batter into the cups.
  • Bake at 180 degree centigrade for 20 minutes or till a pin inserted comes out clean.
  • Once done move onto a cooling rack.
  • Dust a bit of powdered sugar on the top for the finale.

Saturday, 3 December 2016

Ginger Cookies

It is winter, it is Christmas and baking just happens this season! Listening to the carols, there I went baking again.  

My mind began wandering to 'Long time ago in Bethlehem',
In the 'Silent Night'
I envisioned 'Hark the herald, angels sing'.
The bright stars guiding 'We three Kings of Orient are'
Led them to the place where 'Mary's boy child Jesus Christ' lay.
 ' O Come All Ye Faithful' and spread the word.
'Go tell it on the mountain' and spread 'Joy to the world'.

It is a 'Merry Merry Merry Christmas'
And 'Santa Claus is coming to town'
'Dashing through the snow' here he is
With 'Rudolf the red nose reindeer' by his side
and 'Frosty the snowman' to welcome him
I 'Decked my halls with boughs of Holly',
and keep dreaming about a 'White Christmas'.

Looks like an overdose of carols!! Oh Never mind, like Shibin says when Christmas is over we should be tired of listening to carols and I still have 21 days more to go!

I am not a wonderful baker to be honest! I have had my disasters in the oven. There was a time I used to give up if I did not get the recipe right in the first go. Over time, I have learnt that patience has its virtues and I am ready to give several shots before I get it right. The end result has always been worth it for me!  The smell of the freshly baked goodies and the delight on the faces of my food testers:) make every effort worthwhile. I have learnt on the go that oven of different models behave differently, the type of flour that each one uses would have different levels of tolerance to moisture and so on and so forth. At the end of this recipe, I have given a few tips based on my baking experiments.

So here is my recipe - Ginger cookies

kitchenspells.blogspot.com

Ingredients

  1. All Purpose Flour - 1 and 1/2 cup
  2. Baking Soda - 1 tsp
  3. Ground dry ginger - 2 tsp
  4. Ground cinnamon - 1 tsp
  5. Ground nutmeg - 1/2 tsp
  6. Salt - 1/4 tsp
  7. Brown Sugar packed - 1/2 cup
  8. Butter - 100 gms
  9. Egg - 1 medium size
  10. Vanilla essence - 1 tsp
  11. White Sugar for rolling the cookie dough


Method
  • Combine the dry ingredients listed from 1 to 6 and sieve them well
  • Make sure your butter is at room temperature. Add the brown sugar to a bowl of butter and cream it using a electric beater or a hand whisk
  • Break open an egg into this, add the vanilla essence and combine well
  • Slowly, add small batches of the sieved ingredients, mixing with a spatula to combine
  • Once the dry ingredients have combined with the wet, dig in your hands to do a bit of kneading and bring the dough together
  • Let the dough rest for about half an hour
  • Meanwhile line your tray with baking parchment and pre-heat your oven
  • Wet your hands and pinch off small lemon sized balls from the dough. Roll it in a plate of white sugar until the ball is completed coated in sugar
  • Place this on the baking tray and leave sufficient gap between the cookies for it to expand
  • You could either bake the cookies as is or press it down with a fork and flatten it slightly
  • Bake for 15 minutes at 180 degree centigrade
  • Once done, transfer it to a cooling rack
  • This cookie goes extremely well your cup of tea. Try it to believe it!
kitchenspells.blogspot.com

You may also note - 
  • Ovens quite often behave differently depending on the brands, capacity and energy source. You may have to do several trials with your oven before you have the perfect cookies or cakes. When I started making cookies- I often used to get the underneath of it burned and the inside still uncooked. Its after quite a few experiments that I started getting the texture right. Patience always pays and the first time need not always be your best!
  • If you are using a gas oven that lights up only at the bottom, you could try placing the baking tray at the top most slot and baking it for a while longer than suggested in the recipe.
  • In case your cookie dough is a little too soft and you are finding it difficult to roll, just refrigerate the dough for a while.
  • Cookies generally seem a little under cooked when you take it out of the oven - let it cool to harden and get its color.

Sunday, 11 September 2016

Kala Chana Sundal/ Black Chickpea Sundal

Often happiness comes in small packets and learning to live in these small packets makes the complex system called life all the more meaningful. Not that I live to dot as per the philosophy I just quoted above but I do try and do want to. The same is applies to food as well - its not just elaborate buffet meals that satisfy your souls, it could be quick fixes like the recipe for today that brightens the soul. I do not mean to dampen the spirits - I know buffets can be more than soul satisfying for the foodie in us but a serene evening in the company of simple food can just do as well when hunger pangs are not too ardent.

Another beginners recipe - Kala Chana Sundal with minimum ingredients and that can be snack in itself or a side dish. Hoping on to the recipe.

kitchenspells.blogspot.com

Ingredients
(Serves - 2)

  1. Black Chickpea - 1 cup boiled
  2. Onion - 1 medium finely chopped
  3. Coconut grated - 3 tbsp heaped
  4. Coriander leaves - chopped
  5. Chilly powder - 1 tsp
  6. Oil
  7. Salt to taste
Method

  • Soak black chickpeas in water for at least 8 hours/overnight and pressure cook it up to 6 whistles. Drain off excess water and set aside the chickpeas.
  • Heat oil in a skillet and add the finely chopped onions. Saute for two minutes until cooked and add the chopped coriander leaves. 
  • Add chilly powder and saute till the masala is done. Add the coconut and saute till there is no trace of moisture content. This may take about 3 - 4 minutes on medium flame
  • Tip in your chickpeas. Bind it well and cook it covered for a maximum of 5 minutes on low flame.
There you go - Kala Chana Sundal is ready. You could have it as a snack or goes well with rotis as well.

kitchenspells.blogspot.in


Saturday, 16 July 2016

Goli Bajji/ Mangalore Bajji

It is the peak of the summers in Dubai and my heart longs for the monsoons in India.
Waking up to the sound of rains..
A rainy evening with a mug of hot coffee..
A walk in the rains..
Getting splashed - ugh!! Sounded annoying back then, but now! I need that one splash. 
And of course, the hot fried bajjis that lifts your spirits.
That is something I can do in Dubai too!
My thoughts went scrambling and this is what it resulted in.
kitchenspells.blogspot.com

Cheers to Goli Bajji/ Mangalore Bajji with hot tea that sent me down many memory lanes. While I get nostalgic, why don't you guys have a sneak peak at what is below - 

Ingredients
  1. All purpose flour - 1 cup
  2. Yogurt - half cup
  3. Rice Flour - 2 tbsp
  4. Onion - 1 medium chopped
  5. Ginger - 1 tbsp grated
  6. Green Chilly - 1 sliced thinly
  7. Curry Leaves - 1 sprig finely chopped
  8. Coriander Leaves - a handful finely chopped
  9. Asafoetida - 2 pinches
  10. Baking powder - 1/4 tsp
  11. Sugar - 1 tbsp
  12. Salt to taste
  13. Oil for deep frying
Method

  • In a bowl, whisk the yogurt and add all purpose flour, rice flour and the baking powder. 
  • Once the ingredients have combined well, add the chopped onion, ginger, green chilly, curry leaves and the corriander leaves.
  • Add asafoetida, sugar to the mix and salt to taste.
  • Keep the mixture standing for 1 to 2 hours.
  • Heat a skillet and add oil to this.
  • Dip your hand in water and scoop a lemon sized ball of the batter and carefully place in the oil( be careful not to burn your hands)
  • 4 - 5 balls can be placed at a time. Flip it over once the side has browned. It may take about two minutes to cook on medium flame.
  • Carefully remove from the oil and place on tissue to drain off the excess oil.
  • Serve it hot and crisp with coconut chutney
kitchenspells.blogspot.com
You may also note - 
  1. Adding the rice flour gives the crispness to the bajjis.
  2. If you find the batter too thick, add water to reach the desired consistency.
  3. Constantly keep the flame on medium to avoid under cooking or burning of the the bajjis.
Recipe shared by a dear friend - Vandana


Saturday, 25 June 2016

Bread Kai Pola - Malabar Iftar recipe

It is simply amazing how simple ingredients come together to form a perfect cuisine. This Pola recipe combines egg with bread and plantain to form a delectable snack. It was only recently that I was introduced to Malabar cuisines and I am loving them. I definitely intend to try more of the Malabar flavors.
Quite co-incidentally, during my recent visit to India, my aunt, in order to save overripe plantains from rotting away introduced me to this recipe. I liked the combination and ventured to add bread also into the recipe to make it a wholesome dish.

kitchenspells.blogspot.com

Here is the recipe - a simple quick win snack.

Ingredients
  1. Eggs - 5 no.s
  2. Plantain - 4 medium size
  3. Bread - 6 slices
  4. Sugar - 2 tbsp
  5. Milk - 1/4 cup
  6. Salt - 1 pinch
  7. Cinnamon powder - 1/4 tsp
  8. Ghee - 2 - 3 tbsp
  9. Cashewnuts - 2 tbsp chopped
  10. Raisins - 2 tbsp
Method

Cut the plantain into cubes and shallow fry them in ghee until the yellow color of the plantain begins to turn brown. Fry the cashew nuts and raisins in the same ghee and keep aside.

Chop the bread into small squares. I used brown bread as the healthier option, you could substitute with white bread as well.

Break open the eggs and beat it well along with the milk, salt, sugar and cinnamon powder.

Add the fried plantains and the bread squares into the beaten eggs.

Meanwhile, heat a skillet and grease it with ghee. Pour in the mixture to the pan, top it with raisins and cashew and heat on low flame covered for 5 minutes. 

Pre-heat the oven for ten minutes at 180 degree centigrade and transfer the skillet to the oven at the same temperature.

Bake it uncovered until a knife inserted comes out clean.

Remove it from the oven and keep it covered with a aluminium foil for ten minutes before slicing and serving it.

kitchenspells.blogspot.com

You may also note - 
  1. The riper the plantains you use, the better the taste
  2. You could try a combination of fried and fresh plantains for better flavors
  3. Once you add the bread squares, transfer to skillet immediately in order to prevent the bread from absorbing the entire mixture.


Saturday, 30 April 2016

Chicken n Cheese Rolls

Come the Fridays (Oh yeah that's right, weekends are Fridays and Saturdays in UAE) and the desire to try out something new in the kitchen erupts. We desperately needed a snack to pump us out of our laziness into action! I had a chicken breast in my fridge and mozzarella cheese too. Well, Friday magazine also published a recipe of Beef and Mushroom rolls which came as my inspiration.
So it was decided, I am gonna make a roll and I am gonna bake it as well.

I made the Filo pastry for the rolls as well, I must say it came out pretty good - definitely worth a try.

kitchenspells.blogspot.com


Ingredients

For the Filo pastry

  1. All Purpose Flour - 2 cups
  2. Warm Water - 3/4 cup
  3. Salt - 1/2 tsp
  4. Olive oil - 3 tbsp
  5. Corn Flour - for dusting
For the filling
  1. Chicken - 200 gms
  2. Onion - 1 big finely chopped
  3. Garlic - 1 tbsp finely chopped
  4. Parsley - a handful chopped
  5. Pepper powder - coarsely ground
  6. Tomato sauce - 1 tbsp
  7. Mozzarella cheese - 200 gms
  8. Salt to taste
  9. Oil - 2 tbsp
Method

To make the filo pastry, take a bowl with sieved flour with salt. Gently add warm water, forking it out gently to let the moisture settle into the flour. Add the olive oil and bring together to make the dough. Make smaller balls out of the dough and roll it in corn flour. Place this on a tray and cover with a cling film. Allow this to rest for 1 to 2 hours.

Cook the chicken with a little pepper powder, salt and water.  Once cooked, shred the chicken into smaller pieces.
Heat oil in a skillet, add the chopped onion and garlic and saute it for 5 minutes.Add the shredded chicken, chopped parsley and season with salt and pepper. Saute for another 5 minutes, Switch off the flame and add tomato sauce to this. Let this cool.

Back to the Filo pastry. Flatten the balls using a roller until thin and cut this into squares of 10*10 cms. Brush olive oil onto the surface. Layer it on cling films or plastic so that it does not stick to each other.

Place sufficient filling along the side of the square. Add cheese of your desired quantity. Roll it over once and fold in the top and bottoms of the square. Complete the rolling and stick the ends using a little water.

Pre-heat the oven for 20 minutes to 200 degree centigrade. Place the rolls on a greased baking tray with the outer rolled end facing the bottom. Brush the surface with egg white to make it crisp and give the baked rolls a darker shade. Bake for 25 minutes at 180 degrees and then increase to 200 degree centigrade. Once cooked, transfer from the baking tray and serve with your favorite sauce.

Alternatively, you could buy Filo pastry and use the same stuffing. Instead of baking, it can be deep fried too. The choice yours:)

Saturday, 9 April 2016

Spicy Egg Fry

In the hustle bustle of modern life, people find it difficult to cook up elaborate recipes. We look out of quick wins that soothe our taste buds after a stressful day. A couple of my bachelor friends requested for recipes that are quick and easy to whip up. So both the needs combined together, we decided to come up with some easy beginners recipes - that are soul satisfying in both the ways.

Here is a recipe with hard boiled egg that takes you a maximum of 5 minutes to make if you have boiled eggs with you. It is a spicy kick to the normal boiled eggs.

kitchenspells.blogspot.com


Ingredients
  1. Egg - 2 no.s
  2. Oil - 1 tbsp
  3. Chilly powder - 2 tsp
  4. Salt to taste
Method

Take 2 eggs in a saucepan with water just enough to cover the eggs and bring it to a boil. Simmer on medium flame for ten minutes and switch off the flame. Transfer the eggs to a bowl of tap water and let it cool. Peel the egg under running tap water - makes it easier for the shells to come off. Using a knife create slits on the egg so that the flavors can seep in.

Pour oil into a pan. Once the oil is warm, add a tsp of chilly powder. Just when the color starts to darken, add the eggs. Keep tossing the eggs in the oil, so that the entire egg is coated. Add sufficient salt and fry this for another 2-3 minutes on medium flame continuously tossing it.

Transfer this to a plate and devour it either as a snack in itself or along with bread of your choice.

You could drop the same eggs into a curry if you choose to make one or even add fried onions along with the eggs for an extra zing.

kitchenspells.blogspot.com