Saturday 23 December 2017

Apple French Toast


This Christmas season has been a busy one. Lots of baking , mall hopping to see the Christmas decor, karaoke singing of Christmas carols to watching Christmas movies - we have done it all. With my sister in town to celebrate Christmas with us we have had quite a spike in our December activities.So while I sit down to relax before beginning the Christmas eve preparations, thought of sharing a quick recipe for your Christmas breakfast table.

Apple french toast is simply the addition of Green apples to your normal french toast and getting it baked. Scroll below to the recipe!!

Meanwhile, Have a holly jolly Christmas this year!!

A Joyous Christmas to all!


kitchenspells.blogspot.com


kitchenspells.blogspot.com

Ingredients
  1. Green Apple – 1 big finely sliced
  2. Butter – 2 to 3 tbsp
  3. White bread – 10 pieces
  4. Milk – 400 ml
  5. Egg – 2 large
  6. Sugar – 2 to 3 tbsp
  7. Salt – ¼ tsp
  8. Cinnamon  powder – ¼ tsp

Method
  • Pre-heat the oven at 180 degree centigrade for 15 minutes
  • Heat butter in a pan. Layer apples in the pan and cook until tender.
  • Cut the bread into smaller pieces.
  • Break open the eggs into a bowl. Whisk well and add milk, sugar, cinnamon powder and salt. Combine well.
  • Layer the bottom of a baking pan with the cooked apple.
  • Dip the bread pieces in the egg mix and layer this on top of the apples. Alternatively, layer the top with bread slices and pour the egg mix  on the top till the bread is soaked in the milk.
  • Bake at 180 degree centigrade for 30 minutes to 40 minutes or until done.

Friday 15 December 2017

Cranberry Cobbler Dump Cake

Christmas waves a magic wand over this world, 
and behold, 
everything is softer and more beautiful. 
                        
                                     -Norman Vincent Peale


Dump it all together - there you have a dessert on your table!
Cranberry sauce, topped with cake mix and butter drizzled on top - that is the name of the dish deconstructed for you!
This is my first guest post and I am happy I got to do it with thebigsweettooth . Rafeeda of The Big Sweet Tooth is one of first bloggers I got introduced to through blogging. Her blog is a repository of recipes - a go to website for all your recipe needs. I am so glad I could add to her repository. Head over to her blog to check out my recipe for Cranberry Cobbler Dump Cake.

Wednesday 6 December 2017

Kerala Mutton Stew

Christmas is a time that brings back so many memories. Some are funny as can be!
Good food comes with any celebration and Good food comes after so many failed attempts too! Christmas is no less.

Our first Christmas together was within a month of moving to Dubai. The cooking range oven and the griller were totally new to me. All that Shibin wanted for Christmas was 'Karangunna Chicken' - loosely translated rotating chicken. Don't whack your brains! He only meant to have those rotisserie grilled chicken :) I had my chicken marinated and for reason best known to no one I decided to place the marinated chicken in the freezer! We went out shopping got back a little late - just in time for dinner which was till in the freezer. I had no time to defrost. I placed it in the oven to melt the stubborn ice. After a while onto the rotisserie. The chicken was big and the marinade was all dripping down which is when I realised that I needed a dripping pan too. After all the trials , we still had an uncooked chicken two hours later and a messy oven. Then we did what we could do best. Cut the chicken and pan fried them. That is how we ended up eating our Christmas dinner at 12 am! Boy, I am glad we did not have any guests.

kitchenspells.blogspot.com


Moving onto the recipe. Whenever I hear mutton stew I cannot help but suppress a smile. Tell the same to my mother - she will have her volley of justifications. You will know why soon:) We were never very fond of mutton, so mutton was almost never bought at home. Once I happened to taste mutton stew with appam at a friends place for a wedding. I came home with a demand that it be mutton stew for Christmas morning instead of the usual chicken stew. Pappa bought mutton and Mamma set out to make it. The stew turned out fine but it tasted a wee bit different and had a sour taste. We went on to eat a stomach full. On her hunt for the curd she kept in glass mug to marinate the chicken for biriyani  (our Christmas lunch) did my mom realise that she had poured the curd into the stew instead of coconut milk that was in a similar cup! Nevertheless she says the stew turned out good and this how new things are discovered:) She is not going to spare me for this!

kitchenspells.blogspot.com

Here we go - 

Ingredients

  1. Mutton  – 500 gms
  2. Potato – 2 medium sliced
  3. Onion – 1 big thickly cut lengthwise 
  4. Green Chilly – 3-4 slit
  5. Ginger – 1 tbsp finely chopped
  6. Cardamom – 3 to 4
  7. Cinnamon sticks – 2 sticks of 1 inch
  8. Cloves – 3 to 4
  9. Thin coconut milk – 2 cups
  10. Thick coconut milk – ½ cup
  11. Salt as needed
  12. Water as needed
  13. Coconut oil

For Tempering

  1. Coconut oil – 2 tbsp
  2. Curry leaf – 2 sprigs
  3. Onion – 1 small sliced in cubes
  4. Peppercorns – 3 to 4

Method


  • Heat oil in a thick bottom pan. Add the whole spices and fry until aromatic.
  • Next, add onions, ginger and green chilly. Saute until the ginger is cooked.
  • Add mutton pieces and cook until the mutton is almost done. Pressure cook if need be.
  • Add the potatoes and adjust salt.
  • Add thin coconut milk and cook it covered until the mutton is done.
  • Add thick milk and switch off the flame as soon as the stew begins to boil.
  • For tempering, crush onion and pepper in a mortar and pestle.
  • Heat oil in a pan, add the crushed onion and pepper along with curry leaves. Saute till done.
  • Temper the stew with this mix. Keep it covered for a while.
  • Serve hot with appam!


Tuesday 28 November 2017

Lovlolikka Wine ||Cooking with Family and Friends - #5||

Does the word Lovlolikka ring a bell? I am sure atleast a few malayalees have heard of those red cherries that grow abundantly in their backyard and that grand moms fondly fed you in pickles. Lovlolikka is mildly sour, tangy with a tinge of sweetness and may not be as popular for eating as is when compared to the pickles and jams that are dished out from these cherries.

I did a hunt for the English name of this cherry and google threw up names like Indian sour cherry and Indian coffee plum. To keep things simple let's call it cherry:) My mom in law has a lot of these cherries peeping into her backyard from the neighbor's garden. The neighbors have graciously offered her all the cherries that grow on the branches hovering in her yard and trust me they are a basketful. So that is how Lovlolikka wine came into being for us. She did not use yeast for fermentation but the wine came just as good with a lovely color.

Hardly a month for Christmas and if you start now, I bet your wine would be ready just in time for Santa!

So here is the 5th recipe in the series of Cooking with Family. This time again with mom-in-law.


kitchenspells.blogspot.com

kitchenspells.blogspot.com


Ingredients

  1. Lovlolikka/Indian sour cherry - 1 kg
  2. Sugar - 300 gms
  3. Cloves - 5 to 6
  4. Cinnamon stick - 2 pieces of 1 inch
  5. Water - as needed
Method
  • Wash the berries in water to remove any dirt and pat dry them.
  • Dry a big glass jar and add the berries into the jar.
  • Add the sugar along with the cloves and cinnamon sticks.
  • Pour warm water till the level of the berries in the jar.
  • Using a wooden spatula give it a good stir. Cover and keep in a dark and dry place for a week.
  • Stir again on the 5th day and 10th day by when the berries would have grown softer. Crush the berries using the spatula in the process.
  • Leave it covered and untouched for next 10 days.
  • On the 21st day, using a sieve filter out the liquid from the pulp. Store the wine in glass bottles until ready to consume.
  • Hurry up, if you start now your wine will be ready by Christmas.
You may also note 
  1. Sweetness can be increased or decreased as you like.
  2. Most of the recipes call for addition of yeast but it works fine without it as well.
  3. You may try using other berries/ fruits in the same recipe.

Friday 17 November 2017

Karimeen Fry|Pearl Spot Fish Fry || Cooking with Family and Friends - #4||

Another vacation has come and gone by. Every food restrictions you impose on yourself goes for a toss when at home in India. Initially I struggle and some how maintain a balance. After a point in time, all the determination fades and I end up eating without a second thought ( The angel in asks me to eat the food cooked with love by your family and the devil in me reminds me of the weighing scale. After conflict of interests, the devil surrenders to the angel) The first few days after the vacation is again a transition mode. Trying hard to suppress my cravings and get back into routine ( not to forget the yummy stuff you have tugged along all the way from India) One week into our return and I am still fighting off the eating frenzy.

kitchenspells.blogspot.com

My series of Cooking with family took backseat for a while and now I am back with the 4th in the series. Recipe from my mother-in -law's kitchen. Her fish fry always tastes different from the normal ones I have had and here is the recipe for you.

kitchenspells.blogspot.com


Ingredients
  1. Karimeen/ Pearl Spot - 2 medium size
  2. Garlic - 2 to 3 pods
  3. Fenugreek powder - 1 pinch
  4. Kashmiri Chilly powder - 1 tsp
  5. Pepper powder - 1 tsp
  6. Turmeric powder - 1 pinch
  7. Salt to taste
  8. Water 
  9. Oil for shallow frying
Method
  • Clean the fish, let excess water drain off and create deep gashes.
  • In a mortar and pestle, crush the garlic pods. 
  • To this add chilly powder, pepper powder, fenugreek powder, turmeric powder and salt and combine well. Add just enough water to form a thick paste.
  • Apply this marinade on the fish and let it rest for 15 minutes.
  • Heat oil in a pan and place the fish in the pan. Let it cook for 5 to 8 minutes or until done on one side uncovered. Flip and cook the other side as well.
  • Drain excess oil on kitchen tissue and serve hot with some vegetables

Monday 23 October 2017

Fish Chilly with crushed peanuts

I am in India on vacation and I did crazily hope to see the rains. As luck would have it, rains were not so benevolent on me and decided to stay clear! The weather is definitely good but to witness rains would have simply been bliss. I still have time left and I hope to see the showers of blessings at some point.

It is hard to be on vacation and stay off food!So I am busy eating, at the same time hoping that I do not add kilos on the scale! (All of us know how hard that is right!!)

Anyways, here is a recipe to try. What makes it special is, as the name states the addition of ground peanuts!Try it to believe it!


kitchenspells.blogspot.com

Ingredients
  1. Fish - 400 gms
  2. Onions - 3 finely chopped
  3. Garlic - 2 tbsp finely chopped
  4. Green chilly - 3 to 4
  5. Pepper powder - 1/2 tsp
  6. Peanuts - a handful
  7. Soy Sauce -  2 tbsp
  8. Vinegar - 1 tbsp
  9. Salt to taste
  10. Vegetable oil
To marinate
  1. Turmeric powder - 1/2 tsp
  2. Pepper powder - 1 tsp
  3. Ginger- garlic paste - 1 tsp
  4. Soy Sauce- 1 tbsp
  5. Salt
kitchenspells.blogspot.com

Method
  • Clean and pat dry the fish slices. Prepare a marinade of turmeric powder, pepper powder, ginger garlic paste, soy sauce and salt. Marinate the fish in this for 15 to 20 minutes.
  • Roast and coarsely grind the peanuts in a mortar and pestle.
  • Shallow fry the fish in oil till crisp on both the sides. Drain excess oil on a kitchen towel.
  • In the same pan add the chopped garlic and fry for a minute. Add the onions and saute until it wilts.
  • Add slit green chillies and fry for another minute before adding in the pepper powder, vinegar, salt and soy sauce. Let this cook for a minute on low flame.
  • Toss in the fried fish along with the ground peanuts. Give it a good mix before turning off the flame.
You may also note
  1. Be careful while adjusting the salt level as soy sauce has salt in it already.

Sunday 15 October 2017

Besan Laddu

I am a proud Indian. I do not live in India now but that does not make me any lesser an Indian. It hurts me to see Indians fighting in the name of religion, state, caste and anything you can possibly think of. How better a country we would be once we start appreciating the uniqueness of the country. Where else can you find a country so diverse - just imagine the number of dance forms even within a state! The state of Kerala for example boasts of Mohiniyattam, Kathakalli, Ottam thullal, oppana, Thiruvathira, Marghamkali and many more to go. If this is the story of one state in India, summing up that of all states together will have dance forms that is beyond math I can do now! The festivals , the religions, languages, food, culture also follow the same swing. India is a country that defines the spirit of UNITY IN DIVERSITY! Let that not go waste due to the selfish intents of a handful who stand to gain. I am proud I belong to a country like this and our heritage is something that needs to be preserved and not washed away. If we do end up fighting amongst ourselves, we are just heralding another era of the British invaders divide and rule policy which can be of no good - zilch economic development coupled with brain drain!

Having said that, Diwali ( I am inclined to say - the most celebrated festival in India) is just a few days away. Being a Christian, I have no religious affiliation with this festival but I do take part in the celebrations since I am an Indian. There was a time in childhood were crackers were part of my household too during Diwali - well gone are those days!  You can't take cooking away from me though - so here is our Diwali recipe. 

kitchenspells,blogspot.com


I loved the tiny Besan laddu at the bakeries in India which comes in small boxes and easy to gulp down. I just tried making a replica of the same. I cannot say I got it exactly the same but I would say its somewhere close!

A Very Happy Diwali to you all!

kitchenspells.blogspot.com

Ingredients
  1. Besan/ Gram Flour - 1 cup tightly packed
  2. Ghee - 1/4 cup
  3. Semolina/Rava - 4 tbsp
  4. Powdered sugar - 1/4 cup
  5. Cardamom powder - 1/4 tsp
Method
  • In a thick bottomed pan, heat 1 tbsp of ghee. Add the semolina and roast it until color begins to lightly change. Remove from heat and set aside.
  • Keep aside 2 tbsp of ghee and pour in the rest into the same pan. Add the gram flour and roast until fragrant and the color begins to change to brown. Ensure that the flame is either on low or medium low else the flour tends to burn from the bottom or get roasted unevenly.
  • Turn off the flame and add the roasted rava and once the mix is warm enough to handle with bare hands, add in the powdered sugar along with cardamom powder. Combine this mix well using your hands. In case you need more ghee, use the ghee set aside at this stage.
  • Make balls out of this mix and set on a plate. Give it about half an hour to set well before gobbling it down:)
You may also note -
  1. It takes about 20 minutes to roast the gram flour. A bit of patience goes a long way here:)

Friday 6 October 2017

Fish Cutlet

Time flies by in Dubai - yet another winter is peaking over the horizon. I love winters. If only I could do away with the occasional flu that tends to interrupt the weekend outing plans. We are done with the first flu of the winter which I would like to call the 'change of season flu' that has so become ingrained in our lives for the past three years. Looking forward for a blissful few months that includes a vacation home and not to forget the impending festival season.


On that note, we head over to the new recipe on the blog - Fish cutlet. The type of fish you choose is absolutely your choice - the lesser the bones the easier the task of mincing it. Cutlets can make your weekday dinner cooking a little easier. Just prep a batch over the weekend and freeze it!

Here goes the recipe - 


kitchenspells.blogspot.com


Ingredients
  1. Fish - 1 kg
  2. Potato - 2 medium sized
  3. Ginger - 1 tbsp grated
  4. Green chilli - 4 to 5 finely chopped
  5. Onion - 2 medium finely chopped
  6. Turmeric powder - 1/2 tsp
  7. Pepper powder - 1 tbsp + 1 tsp
  8. Egg - 2 beaten
  9. Bread crumbs
  10. Salt to taste
  11. Oil for frying
Method
  • Clean and pat dry the dry the fish. Marinate the fish in turmeric powder, salt and pepper (1 tbsp). Steam the fish until cooked through.
  • Let the fish cool and separate the flesh from the fish bones. Using fingers crumble it to smaller flakes/ mince them and set aside.
  • Boil potatoes in water. Skin them and mash them coarsely.
  • In a pan, heat oil and add the onions. Let it sweat before adding in the ginger and green chilly. Saute till the ginger is cooked well.Add in required salt and pepper powder.
  • Add the minced fish to this masala and give it a good mix. Turn off the flame and add the mashed potato. Mix them well.
  • When it is warm enough to handle. Roll them into desired shape.
  • Freeze them for about half an hour.
  • Dip them in beaten egg and roll in the bread crumbs so that it is coated well.
  • Freeze them for atleast half an hour before frying.
  • You could either deep fry the cutlets or shallow fry them until golden brown and crisp on both the sides.
You may also note - 
  • Ensure to freeze them for a while before frying, it helps the bread crumbs to stick on.
  • Ensure the oil is hot enough before dropping in the cutlets, lest they tend to separate.
  • The cutlets once rolled in bread crumbs can be frozen up to 2 weeks.

Wednesday 20 September 2017

Meen Peera| Kerala style fish in grated coconut

Dubai can sometimes be a lonely place. Things took a huge turn a few weeks ago when the Malayalees of the firm which Shibin works for announced an Onam - Eid get together. That was something to look forward for. I got all the more excited when I was asked to join for Thiruvathira. Old traits seldom die:) I love dancing and this opportunity was just so perfect for me. What started off as a mundane Thiruvathira for the ladies and oppana for the kids geared up all the ladies who had let go off all the inhibitions and decided that they wanted to do more. As luck would have it Jimki Kammal Dance Challenge was going places and we decided to do our part as well. It was a simple suggestion by one of the ladies and others were more than eager to join in. The practice that started off in a single song, finally ended in a fusion of three. Despite stage fear, chances of forgetting steps and also the melodrama of having to dance in a saree - we did it! It may not have been the most perfect dance but there is no denying that we perfectly enjoyed every moment of it. We carry no regrets and we are proud our practice paid off!  The Onam celebrations started off with a pookalam, maveli varavelppu and continued to the cultural programs, sadya, tug of war, singari melam to name a few. Every event had its charm but it was the enthusiasm of the people that undeniably made an otherwise normal weekend - a one to remember for months to come. Age was not a bar as everyone present joined the singari melam ensemble and danced away into the evening. As for the employees of the company, 'hi-bye-smile' relationships turned more meaningful and for me I made some wonderful friends!

It is a week now, we still longingly look at the photos and videos that are being circulated. Having said that, it is time to post our next recipe - Meen Peera which is traditional to Kerala. It is a dry fish preparation usually using small fish varieties and grated coconut that serves as a side dish to the meal.


kitchenspells.blogspot.com

Ingredients
  1. Fish - 1 kg ( preferably the smaller fish like Natholi/Anchovy, Mathi/Sardines, Cheriya Aila/Small Mackerel)
  2. Coconut grated - 1.5 cup loosely packed
  3. Ginger - 1 tbsp grated heaped
  4. Shallots/ cheriya ulli - 8 to 10  can be replaced with onions
  5. Kudampulli - 2 -3 pieces
  6. Tumeric powder - 1 tsp
  7. Green chilli - 5-6
  8. Curry Leaves - 2 sprigs
  9. Salt to taste
  10. Water
Method
  • Clean the fish and drain off any excess water.
  • Coarsely grind together coconut, ginger, shallots, green chilly and turmeric. This can be done on a grinding stone, mortar and pestle or in a mixer pulsing it just once or twice.
  • Add this coarsely ground coconut masala to an earthen pot, add the fish along with curry leaves and kudampulli. Sprinkle salt and add half a cup of water.
  • Cook this on low flame for 15-20 minutes until the fish is almost done and leave it open for 5 minutes for any excess water to drain off.
  • Best when served along with rice.
kitchenspells.blogspot.com

You may also note- 
  • Avoid stirring, this tends to break the fish. Using a kitchen towel, hold on to both the sides of the pot and gently toss if need be.
  • Earthen pot has a very high smoking point, hence cooking on low flame ensures that the bottom does not burn.

Sunday 3 September 2017

Pineapple Rava Payasam

Festivities seem to gain more vigour and valour when you are away from your home country. Onam is one such festival and you can find onam celebrations happening till it is time for Christmas celebrations. Every weekend for the next two months in the UAE you are sure to find atleast one person in the traditional Kerala kasavu mundu/saree heading for Onam celebration somewhere. Pookalam ( floral designs), Thiruvathira (traditional dance form),vadam vali (tug of war), sadya (the grand meal) all form a part of this rich festival. This year is no less and I am counting on 3 sadyas this year.

Just like Cake is to Christmas, Payasam is to Onam!

kitchenspells.blogspot.com


Make a sadya or not -payasam is inevitable. This year I wanted to try some milk based payasam other than the semiya payasam. That is when my cousin suggested pineapple. I googled up a few recipes but wasn't quite convinced to try it out myself. Pineapple Rava Kesaribath is one of my favorite food - that is when it struck me to incorporate rava also into the payasam. This payasam just happens to be a modified milky version of the Kesaribath.

kitchenspells.blogspot.com


Ingredients

  1. Pineapple - 1 cup
  2. Rava/Semolina - 1/4 cup
  3. Milk - 2 cups
  4. Water - 1 cup
  5. Sugar - 1/4 cup
  6. Cardamom powder - 1/4 tsp
  7. Raisins 
  8. Cashewnuts
  9. Ghee - 3-4 tbsp
Method
  • Heat ghee in a deep bottom pan and fry the cashew nuts and raisins till it turns golden brown and fluffs up respectively.
  • In the same pan, add the chopped pineapples and fry till the color begins to slightly change color. 
  • Remove the pineapples from the ghee and add semolina/rava. Fry till the color begins to change. Ensure not to burn it.
  • Add 1 cup of water along with sugar and let this cook on low flame for 2 to 3 minutes.
  • Pour in the milk and keep stirring for 5 to 10 minutes until the payasam reduces and thickens.
  • Add the cardamom powder along with the pineapples.Cook for another 2 minutes before finally adding the raisins and cashew nuts and switching off the flame.
You may also note
  • Keep stirring the payasam inorder to prevent it from burning at the bottom.
  • Pineapples can be added at two stages. Either along with water at the beginning or at the end. Some bloggers have mentioned curdling of milk if the pineapples are added at the beginning. However mine did not curdle although I added it along with water right at the beginning. If you are skeptical, you could always add it at the end like mentioned in the recipe above.

Padavalanga Parippu Charu/Curry

kitchenspells.blogspot.com

Onam is here again and it is inevitable that my blog gets adorned with atleast one recipe for the season. I am , as my ex-boss called me NRK - Non Resident Malayalee!! I have spent most of my life in Karnataka and wee bit in Dubai now. I used to look forward to Onam falling on weekends. Only then would I be able to catch all the new movies on Asianet and Surya TV. Vegetarian food was not something I was fond of so sadya was not something that I looked forward to. Occasionally, my sister and I, plucked flowers from my mom's garden and made a small pookalam in our porch. Things changed when I moved to college. With more malayalees, Kerala Kasavu Saree on Onam became a mandate, pookalam a necessity and sadya the inevitable.

I slowly began appreciating the vegetarian delicacies on the leaf and eventually falling in love with them. It took a couple of more years to familiarize with the sadya dishes and the last three onam sadyas have been eventful! Looking forward to another one this year as I post this recipe.

This recipe was shared by my cousin Vinitha - we made it twice so far and the plate was wiped clean!

Here is the recipe for Padavalenga Parippu Charu - 

kitchenspells.blogspot.com

Ingredients

  1. Padavalenga/Snake gourd - 700 gms cubed
  2. Toor Dal - 1/2 cup
  3. Onions - 1 thinly sliced
  4. Green Chilly - 2 slit
  5. Ginger - 1/2 tsp grated
  6. Garlic - 1/2 tsp grated
  7. Coconut - 1/2 cup grated tightly packed
  8. Turmeric powder - 1/2 tsp
  9. Cumin seeds - 1/2 tsp
  10. Curry Leaves - 2 sprigs
  11. Coconut Oil - 1 tbsp
  12. Salt to taste
  13. Water
For Tempering:
  1. Curry Leaves - 2 sprigs
  2. Mustard seeds - 1 tsp
  3. Red chilly- 2
  4. Coconut - 2 tsp grated
  5. Coconut oil - 1 tbsp
Method
  • Wash toor dal in water, drain and set aside.
  • Add oil into a pressure cooker. Saute chopped onions, ginger, garlic, green chilly and curry leaves for 2 to 3 minutes.
  • To this, add salt and turmeric powder. Saute for another minute before adding the toor dal and snake gourd. Add enough water to just cover the ingredients.
  • Cover and pressure cook on high flame for 2 whistles. Let the pressure release before opening the cooker.
  • Coarsely grind together coconut, turmeric powder and cumin seeds. Add this to the pressure cooker. Let it boil for another 5 minutes and turn off the flame.
  • For tempering, heat oil in a pan, add mustard seeds. Once it splutters add grated coconut , red chilly and curry leaves. Fry this till the coconut begins to brown.
  • Add the tempering to the curry.

Tuesday 22 August 2017

Raspberry Lime Granita


kitchenspells.blogspot.com


I have always had a hateful relationship with the summers. I wished for summer vacation to fall during winters! As a kid I was prone to heat boils in summer that would irritate me day and night until my aunt found a solution through it through MEDIMIX soap - now, all Indians especially a malayalee will would relate to this brand of soap:) Moving to Bangalore, made summers a tad bit bearable. When my groom hunt was on, one thing I was very particular of was - No wedding in April and May. Weddings are supposed to be happy moments not disgusting and sweat drenched.
This is my third summer in Dubai and you can imagine the plight of a summer hating creature like me surviving in this part of the world. Coupled with humidity, the weather makes it impossible to step out even for a few fleeting moments. Even if you do all you can think of is getting back under the shower which is not much of a solace because you have hot water running in the taps. I look forward to the summers bidding good bye - the only happy aspect of summer is feasting away on cold guiltless pleasures - ice cream, milkshakes, lassi, anything and everything that comes cold.

Weather in this part of world is slightly getting bearable. Stepping out in evenings is not as daunting a task it used to be the last few months and I am looking forward to the cold season - hoping that it lasts long. Meanwhile sharing the recipe for Raspberry Lime Granita which was made about a month back. It was hard to get a perfect shot because the heat made it melt very quickly.  I had to refreeze it twice to finally a get a decent shot.

kitchenspells.blogspot.com

Ingredients
  1. Raspberry - 250 gms
  2. Water - 1 cup
  3. Sugar - 1/4 cup ( vary as per your level of sweetness)
  4. Lime Juice - 2 tbsp
Method
  • Stir water along with sugar on medium heat until dissolved. Set aside to cool. Squeeze in the lime juice when cool.
  • Pulse the raspberry in a blender. Strain to remove any excess pulp/ solids.
  • Mix this with the sugar syrup until well combined.
  • Pour this into a baking tray or any other shallow dish such that syrup does not form a very thick layer.
  • Freeze for an hour. Then scrape it using a fork 3 to 4 times at intervals of  half an hour to help it form granules.
  • Freeze for another 2 to 3 hours before scooping it out into a glass and serving.

Sunday 13 August 2017

Trek the terre - Cinque Terre


We explored the architectural extravaganza that is Rome and Vatican and then had headed to the beautiful countryside of Tuscany and Umbria. Our last destination would be La Spezia to explore the coastal villages of Cinque Terre. We briefly stopped by Pisa to catch a glimpse of one among the many wonders of the world ( just because I think that there are more than 7 wonders) - The Leaning Tower of Pisa. We took the train to Pisa and had our luggage checked into the baggage area before an approximately 2.5 km walk to the Leaning Tower. We loved the fact that the trains in Italy were well maintained, be it regional, intercity, or the high speed Freccia trains. It was lunch time and we stopped by a restaurant where we fed ourselves on ravioli (yum!!), pasta and finished it off with a panacotta.


If you have visited the Leaning tower, you sure should have a souvenir to substantiate it - you have endless souvenir shopping choices along the road. Magnets, showpieces, caps, key chains, mugs - it is all there. Walking along the winding ways we made it to the tower and it really is LEANING!

Lanes leading to the leaning tower


During the construction of the tower, it is believed to have tilted because of the instability of the soil and flaws in laying out the foundation. The construction took place over 200 years accommodating the tilt into the architecture. You will be lucky if you can get one decent click of the tower because all around you have people posing for cameras trying to either support the tilt or pushing it to tilt further. (google up for images of the tower with people and you will know what I mean). It was fun watching the people in different poses with various expressions, imagining what the final pic would look like!


We spent a good two and half hours here before taking the train to La Spezia. Our host was kind enough to receive us at the station and drove us all the way to our stay which was on top of a hill. The accommodation and the view from the balcony was simply WOW! It was around 7 pm by the time we stepped out to explore the town of La Spezia - almost all shops were closed by then with the exception of few restaurants. After having a walk around the town, we made it to one of the heavily crowded restaurants - coz where there is a crowd, the food ought to be good! And boy, it was! Gnocchi, Pasta and the cutlets were simply good and the portions huge.


Exploring the town of La Spezia

We were done by 10 pm, and it was all the more colder. We alternated between running and walking back to the hill top house to keep ourselves warm. Looking forward to an exhilarating day at Cinque Terre the next day we made it to the hill top and to the cosy apartment.

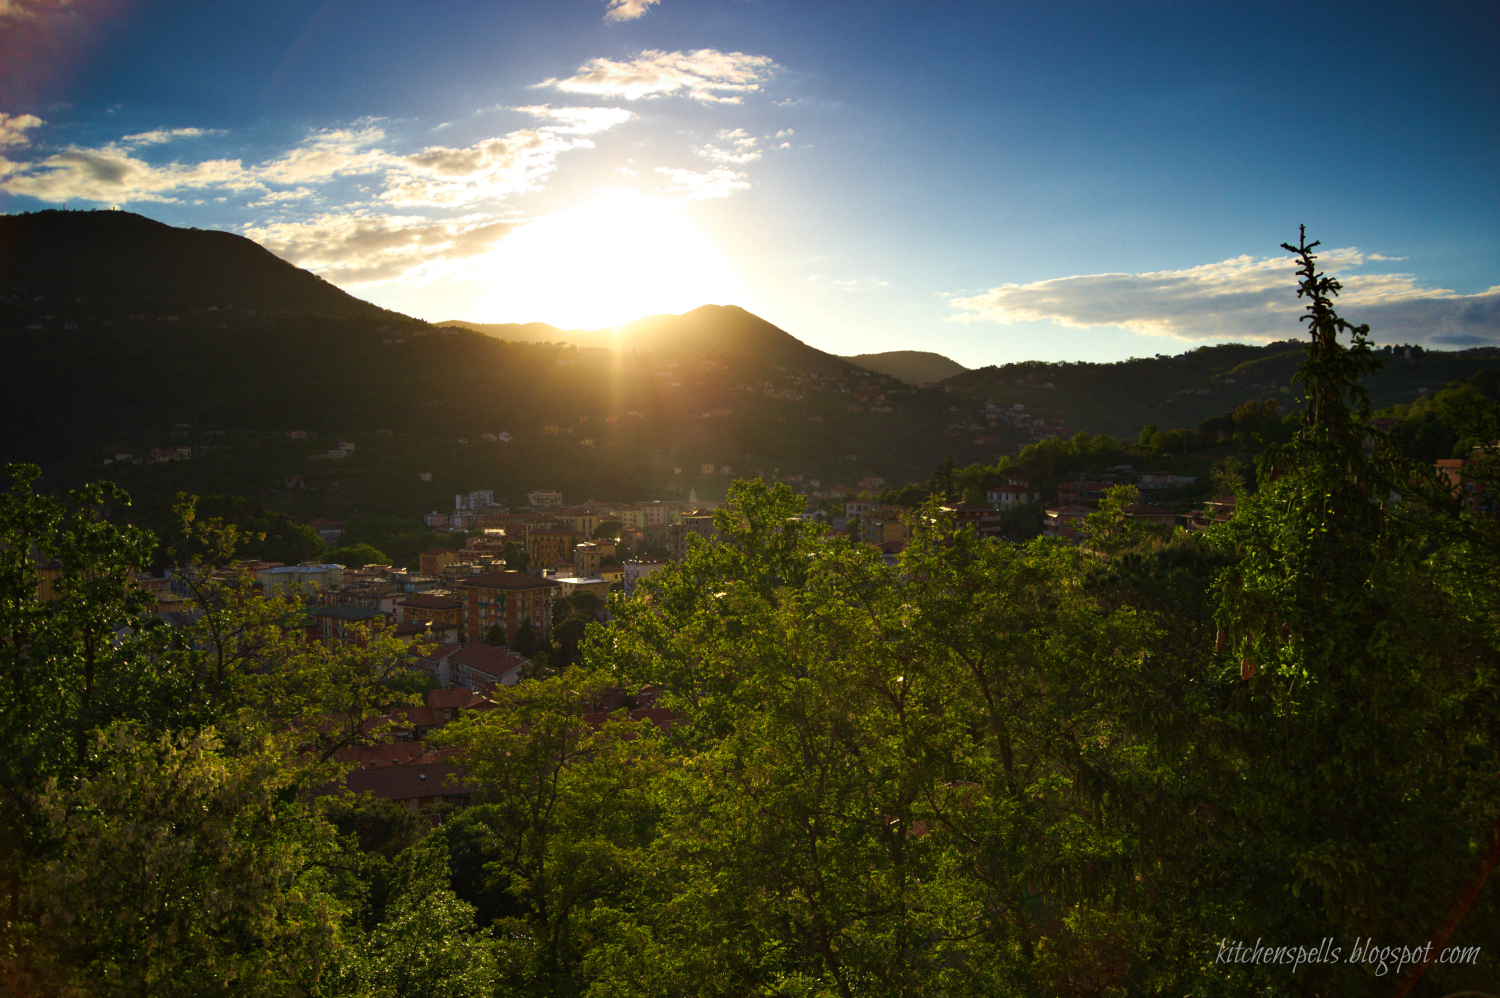
As the sunset - view from the balcony

Night view from the Balcony
We began our next morning over a cup of tea enjoying the view from the balcony. Then we set out to the station to get the Cinque Terre pass. This pass covers the access to Cinque Terre national park, hiking trails, trains, bus shuttle. The hiking trails are in the national park, so it is mandatory to have the pass. There are check points on the trails where you’ll have to show the passes. I think you can buy the passes from the check points too. ( all the way more safer to but it at the station itself!)


Cinque means five and Terre means Land. Cinque Terre simply is the land of five ancient fishing villages – Riomaggiore, Manarola, Corniglia, Vernazza and Monterosso. These coastlines and the surrounding village now form the Cinque Terre National Park and is also an UNESCO heritage site. We took a train along with hundreds of other tourists to Monterosso hoping to catch a good view of the coast line as the train sped by. We had to be disappointed on that since the tracks have been laid through the tunnels and we were mostly engulfed in darkness with occasional view of the sea.

Cinque Terre is a place you need to spend a whole day - start early to cover all the five villages and trekking is the ideal way to do it or you also have buses and trains connecting the villages. Monterosso is a village with a long beautiful coastline and a very colourful market area. This is the place you will get to taste the best focaccia of your life (never mind the copious amount of olive oil that goes into the baking).

Lots of bread to choose from!

We savoured a basil pesto focaccia.
The coastal line of Monterosso

The market area of Monterosso


Thirty minutes along the beach and after exploring the market, it was time to head to our next destination on foot under taking a relatively easy trek (that is what the internet said) to the next village, Vernazza. The trek took us nearly two hours and drained us off our energy! We began our trek by climbing up the mountain often faced by narrow trails which allowed only one person to navigate at a time and if there was anyone coming in the opposite direction we had to wait for them to cross or vice versa. Sometimes it was steep climb or sometimes steps cut out on rocks or even areas where part of the trails were washed off. Lemon trees bordered the trails at some points and at some points we had a beautiful view of the sea. Each turn and bend had breath-taking views. Please make sure you do at least one hike in Cinque Terre, else you miss out on these beautiful views. Our ascent took us about an hour and the next one hour of descent seemed a cakewalk. ( Whoever said the trail was easy must be a pro at this). There are actually different trails that you can take depending on the level of hardship. There are even trails for the extreme hiking enthusiasts.  Vernazza is probably the most beautiful place I have ever seen - I could hardly keep my eyes off the place. As you descent the mountain, there lies ahead of you a rocky cove with the gurgling tides hitting the rocks and then slowly making its way back into the sea. We could not ask for a better place to relax and enjoy our lunch. Friggitoria is a must try if you love seafood. Gather your food packets and head over to the dork, sit by the seaside and enjoy your food. I could sit there all day but we had an agenda to complete.

The churning sea waters!

That is me making my way across the narrow trekking path

View of the beautiful Vernazza from the trekking trail
The lemon trees that grow along the trail
A closer shot of Vernazza

More closer to Vernazza


The colorful village that is Vernazza


This time we took the train to Corniglia.

Corniglia unlike the other villages is not situated by the sea rather on top of a mountain by the sea. You have a sea view but not access to a beach. If you want to avoid the very long climb to the village from the station, there are buses shuttling at regular intervals. This place has more of gelato, slushy and granita available. Choose your flavor before you head out to the next place.

We chose lemon and had it not been for this refreshing cold granita, I would have never reached the next village. 
We debated a lot on whether to take the next trek or not! After all, we were here for a good trekking experience and this was the easiest trek as per google and hence we decided to go ahead. We were expecting an hour's trek that eventually ran into 3 hours .The trail runs through Volastra enroute Manrola. We climbed up, was out of breath, sat down, climbed again. Into an hour we met a couple coming in the opposite direction and asked them how much more longer and they said one hour. We walked along through dense tree areas, by vineyards, by the seaside. We trekked one mountain after other distraught that the next village was not yet in sight. It took 3 long hours and we finally made it. The last bit had about a thousand steps to descend. Our legs were wobbly by the time we reached Manarola. We did have a strong feeling that we missed our way but we do not remember seeing any signboards to direct us. Thank God for the refreshing granita that kept our spirits alive. The first trail we undertook in the morning was buzzing with tourists whereas this one had only few people we came across once a while making it difficult to ask for directions and GPS is not an option in these areas. We walked across the village - Manarola, rested our weary legs, snacking on Farinata (pancakes made of chickpea flour).

The sea never fails to impress

The long trek to Manarola - we were not even half way through!


The view of sunset taken from Manarola station


Munching on a slice of Farinata

Stroll through Manarola
It was getting darker and we decided, we had no time for the last village, Rio Maggiore. We had to make it back to La Spezia which was just 5 minutes by train but the harder task of making our way to the hilltop apartment also had to be accomplished. We were tired, yet we had with us an entirely exhilarating experience to take back with us.  A word of caution to everyone who wants to visit Cinque Terre - not all the trekking paths are open to public. Sometimes the trails are washed out due to rains and hence always inquire before you set out on your trek.

We were up very early the next day to catch the 6 am train to Milan. This was one morning where I would have loved to stay in bed and sleep more into the cold morning. Milan was from where we had our return flight. Our legs were stiff and the knees refused to budge but we made it to the station on time. We mostly slept through the train journey.  Reaching Milan, we checked our luggage into the luggage deposit area and decided to take a stroll through Milan. Being a Sunday, almost everything was closed. On contrary to Rome, Milan seemed a more planned city with wider roads and better traffic rules. There are no words to explain the churches in Italy, the architecture keeps getting prettier and fashion capital Milan was no less. We reached Piazza del Duomo nearby hoping to eat from the famous – Luini’s. Alas! being a sunday it was closed. That was so disappointing! and then we had to settle in for a Pizza Fritta - which is basically deep fried pizza or calzone. We almost burned our tongues when we bit into the hot Fritta, fresh from the deep fryer, but it was so good with all the meat and the gooey cheese inside. We sat by the piazza, although it was mid afternoon the weather was beautiful and enjoyed a parade of people decked in various costumes pass by, accompanied by a band.  The Milan Cathedral is a must visit. Unfortunately we were running short of time and the queue was way too long for us. We had to be satisfied with an external glimpse.

Inside view of a beautiful cathedral in Milan


The Milan Cathedral

We headed back to Milan Centrale station and took our final train to the Milan Malpense airport. There we had reached the end of our vacation! If all the good times could be a wee bit longer!

When you travel somewhere your vacation begins right at the time when you board the flight but after the vacation when you head back there is always an ache that you carry. With a sad heart and memories of days well spent we headed back to Dubai and here in this blog we relived our vacation again!!

Check out the complete Italy Travelogue on our site -

Italy-cised
Roaming Rome and Walking the Vatican
A countryside Escapade - Tuscany and Umbria